
从0搭建ubuntu24.04+rtx5090gpu跑openvla-oft
本文详细介绍了在Ubuntu 24.04系统上搭建openvla-oft开发环境的完整流程。系统配置包括ASUS B560M主板、i5-11400F处理器、RTX 5090显卡和16GB内存。关键步骤包括:安装CUDA 12.8工具包(适配RTX 5090)、PyTorch 2.7.1及以上版本、配置conda环境、安装flash-attn等依赖库,以及解决HuggingFace镜像访问和torc
系统环境
## 硬件信息:
- **硬件型号:** ASUS B560M-P
- **内存:** 16.0 GiB
- **处理器:** 11th Gen Intel® Core™ i5-11400F × 12
- **显卡:** NVIDIA GeForce RTX™ 5090
- **操作系统名称:** Ubuntu 24.04.2 LTS
- **操作系统类型:** 64 位
- **GNOME 版本:** 46
- **窗口系统:** X11
- **内核版本:** Linux 6.14.0-27-generic
基本系统与驱动安装,参考Ubuntu 24.04.2 LTS+gpu5090显卡安装极速安装法-CSDN博客
openvla-oft环境搭建
仓库
https://github.com/moojink/openvla-oft
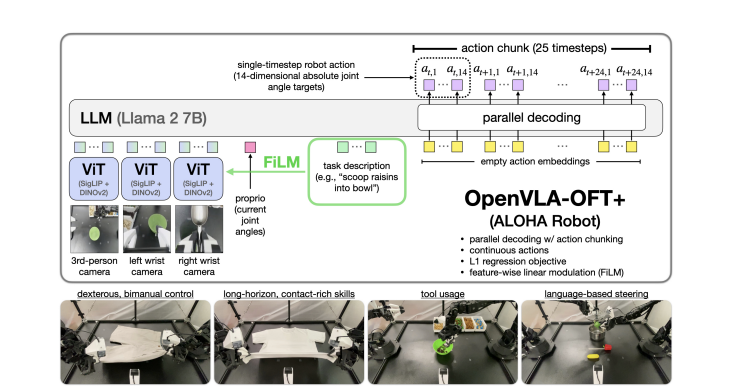
架构图
依赖环境搭建
安装minicoda
安装cuda12.8(5090必须安装12.8以上)
CUDA Toolkit 12.8 Downloads | NVIDIA Developer
#先安装编译的gcc
#https://cloud.tencent.com/developer/information/linux%20cuda%E9%A9%B1%E5%8A%A8%E5%AE%89%E8%A3%85-ask
sudo apt-get update
sudo apt-get install build-essential
# 卸载系统包管理器安装的版本
sudo apt purge nvidia-cuda-toolkit
# 手动删除残留文件
sudo rm -rf /usr/local/cuda*
#下载官方安装包,并安装、
CUDA Toolkit 12.8 Downloads | NVIDIA Developerwget https://developer.download.nvidia.com/compute/cuda/12.8.0/local_installers/cuda_12.8.0_570.86.10_linux.run sudo sh cuda_12.8.0_570.86.10_linux.run --toolkit --silent --override#设置环境变量
export PATH=/usr/local/cuda-12.8/bin:$PATH
export LD_LIBRARY_PATH=/usr/local/cuda-12.8/lib64:$LD_LIBRARY_PATHsource ~/.bashrc
#检验,应输出12.8nvcc -V
安装pytorch(必须2.7.1以上)
pip install torch==2.7.1 --index-url https://download.pytorch.org/whl/cu128
若不用2.7.1以上,会报如下的错误
NVIDIA GeForce RTX 5090 with CUDA capability sm_120 is not compatible with the current PyTorch installation.
The current PyTorch install supports CUDA capabilities sm_50 sm_60 sm_70 sm_75 sm_80 sm_86 sm_90.
If you want to use the NVIDIA GeForce RTX 5090 GPU with PyTorch, please check the instructions at https://pytorch.org/get-started/locally/
安装openvla-oft
# Create and activate conda environment
conda create -n openvla-oft python=3.10 -y
conda activate openvla-oft# Install PyTorch
如上
# Clone openvla-oft repo and pip install to download dependencies
git clone https://github.com/moojink/openvla-oft.git
cd openvla-oft
pip install -e .
# Install Flash Attention 2 for training (https://github.com/Dao-AILab/flash-attention)
# =>> If you run into difficulty, try `pip cache remove flash_attn` first
pip install packaging ninja
ninja --version; echo $? # Verify Ninja --> should return exit code "0"pip install flash-attn --no-build-isolation #用这个不会卡住
安装 LIBERO
git clone https://github.com/Lifelong-Robot-Learning/LIBERO.git
pip install -e LIBERO
# From openvla-oft base dir
pip install -r experiments/robot/libero/libero_requirements.txt
修正依赖包版本
#先安装peft,numpy如下版本否则报错
pip install peft==0.15.0
pip install numpy==1.24.0
运行openvla-oft
替换huggingface的镜像
不修改会报这个错
OSError: We couldn't connect to 'https://huggingface.co' to load this file, couldn't find it in the cached files and it looks like moojink/openvla-7b-oft-finetuned-libero-spatial is not the path to a directory containing a file named config.json.
在run_libero_eval添加如下代码
os.environ['HF_ENDPOINT'] = 'https://hf-mirror.com'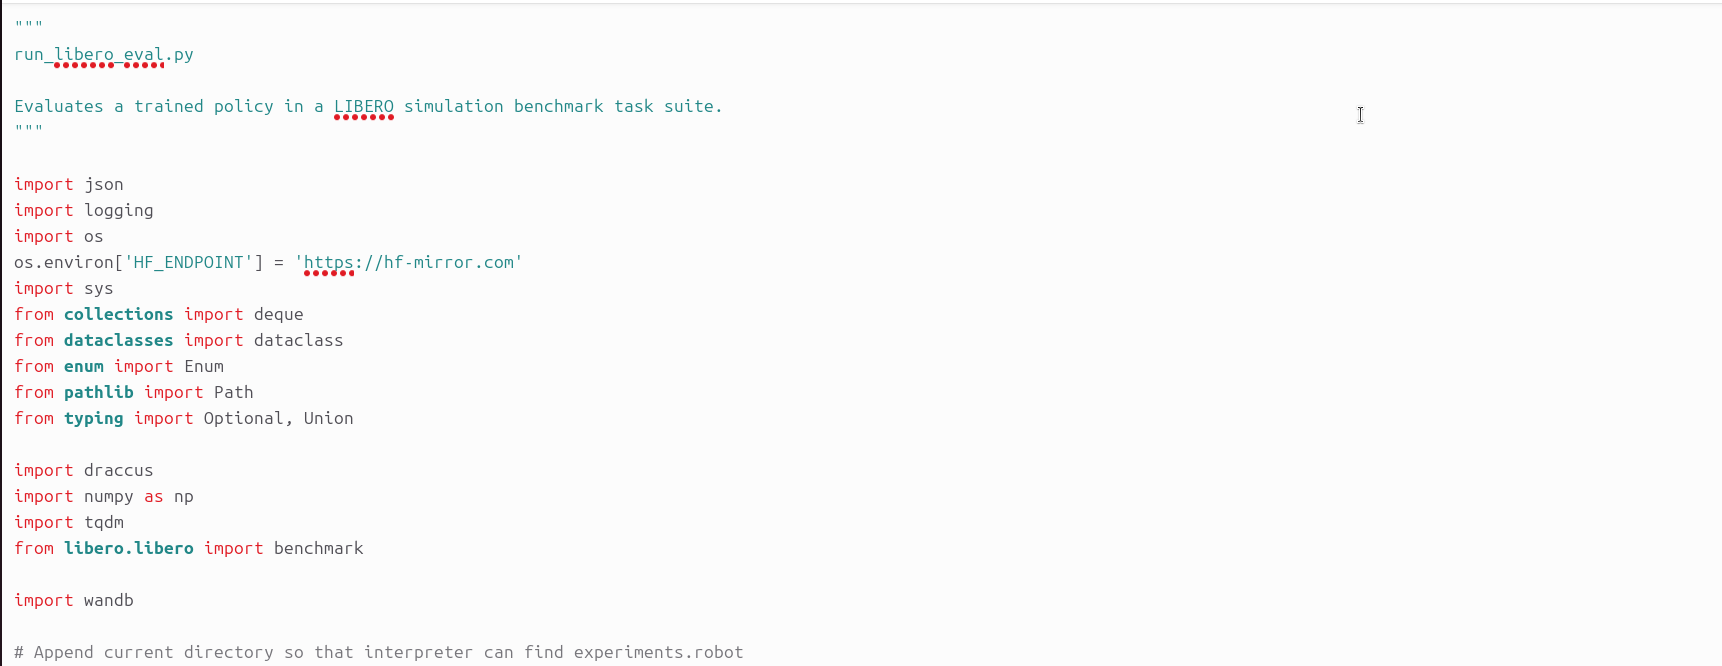
修改torch.load
LIBERO/libero/libero/benchmark/__init__.py里面的64行init_states = torch.load(init_states_path)
修改为init_states = torch.load(init_states_path, weights_only=False)
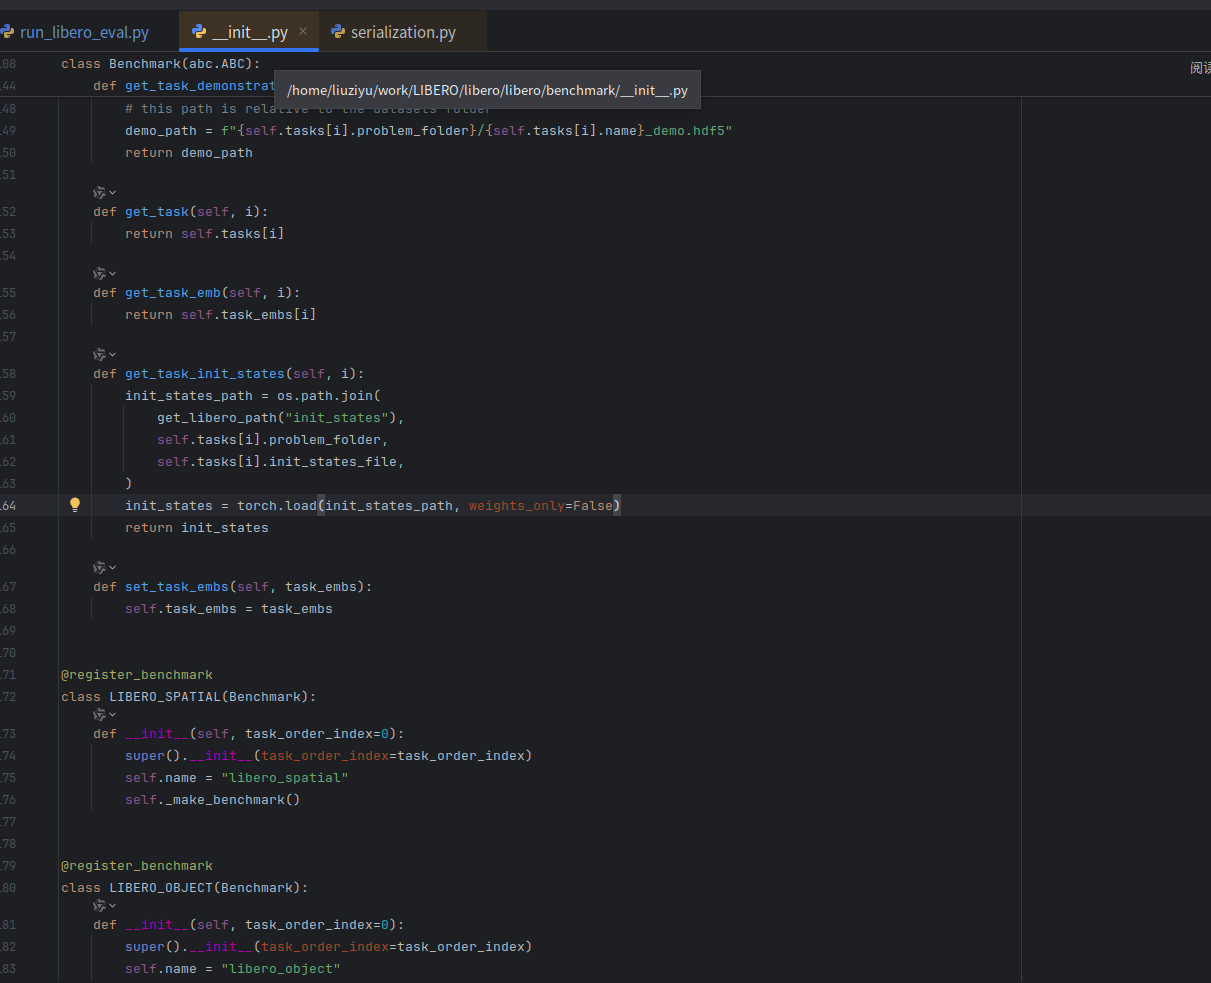
若不修改会报如下错误
 File "/home/liuziyu/work/LIBERO/libero/libero/benchmark/__init__.py", line 164, in get_task_init_states
    init_states = torch.load(init_states_path)
  File "/root/miniconda3/envs/openvla-oft/lib/python3.10/site-packages/torch/serialization.py", line 1524, in load
    raise pickle.UnpicklingError(_get_wo_message(str(e))) from None
_pickle.UnpicklingError: Weights only load failed. This file can still be loaded, to do so you have two options, do those steps only if you trust the source of the checkpoint.
	(1) In PyTorch 2.6, we changed the default value of the `weights_only` argument in `torch.load` from `False` to `True`. Re-running `torch.load` with `weights_only` set to `False` will likely succeed, but it can result in arbitrary code execution. Do it only if you got the file from a trusted source.
	(2) Alternatively, to load with `weights_only=True` please check the recommended steps in the following error message.
	WeightsUnpickler error: Unsupported global: GLOBAL numpy.core.multiarray._reconstruct was not an allowed global by default. Please use `torch.serialization.add_safe_globals([numpy.core.multiarray._reconstruct])` or the `torch.serialization.safe_globals([numpy.core.multiarray._reconstruct])` context manager to allowlist this global if you trust this class/function.
正式运行
# Launch LIBERO-Spatial evals
python experiments/robot/libero/run_libero_eval.py \
--pretrained_checkpoint moojink/openvla-7b-oft-finetuned-libero-spatial \
--task_suite_name libero_spatial# Launch LIBERO-Object evals
python experiments/robot/libero/run_libero_eval.py \
--pretrained_checkpoint moojink/openvla-7b-oft-finetuned-libero-object \
--task_suite_name libero_object# Launch LIBERO-Goal evals
python experiments/robot/libero/run_libero_eval.py \
--pretrained_checkpoint moojink/openvla-7b-oft-finetuned-libero-goal \
--task_suite_name libero_goal# Launch LIBERO-10 (LIBERO-Long) evals
python experiments/robot/libero/run_libero_eval.py \
--pretrained_checkpoint moojink/openvla-7b-oft-finetuned-libero-10 \
--task_suite_name libero_10
运行结果
可看如下测试效果
pick_up_the_black_bowl_next
测试过程需要的显卡内存约17G,单个推理约10s
TODO
更多推荐
 13
13 0
0- 0


 已为社区贡献1条内容

所有评论(0)