
目标检测之数据集(一)——KITTI转VOC
一、引言
对于KITTI数据集,有着很丰富的应用,不仅仅局限于目标检测,这就导致了数据集的标签是txt文件,里面包含了各种任务所需要的标签,因此为了实现目标检测的任务,我们就需要将属于目标检测的坐标从中提取出来再生成对应的xml文件。
二、下载数据
打开官网我们可以看到以下界面,那么我们真正需要的只有标注出的两个文件。

除了可以再官网下载之外,这里再提供一个下载链接
http://share.funcs.xyz/
三、数据形式
首先解压完图像的文件夹就会发现里面有training和testing两个文件夹。其中training是我们需要的,一共7481张图片。而testing暂时没什么用,因为这个没有标签。
接下来我们再来看看标签文件,随便打开其中一个txt文件,我们可以看到以下内容:
car 0.00 0 -1.57 599.41 156.40 629.75 189.25 2.85 2.63 12.34 0.47 1.49 69.44 -1.56
car 0.00 0 1.85 387.63 181.54 423.81 203.12 1.67 1.87 3.69 -16.53 2.39 58.49 1.57
pedestrian 0.00 3 -1.65 676.60 163.95 688.98 193.93 1.86 0.60 2.02 4.59 1.32 45.84 -1.55
每一行的第一个参数代表的是类别,第5-8个代表第是目标检测框的两个角点的坐标。我们的目的就是要提取这5个参数,转换成xml的形式
<?xml version="1.0" ?>
<annotation>
	<folder>VOC2007</folder>					//文件夹
	<filename>000012.jpg</filename>					//xml文件对应的图片的名称
	<source>
		<database>The VOC2007 Database</database>
		<annotation>PASCAL VOC2007</annotation>
	</source>
	<size>								//图片大小信息1242x375
		<width>1242</width>
		<height>375</height>
		<depth>3</depth>
	</size>
	<object>							//图片中标注的物体
		<name>car</name>					//标注的物体类别
		<difficult>0</difficult>
		<bndbox>						//标注物体的bounding box
		<xmin>662</xmin>
		<ymin>185</ymin>
		<xmax>690</xmax>
		<ymax>205</ymax>
		</bndbox>
		</object>
	<object>
		<name>car</name>
		<difficult>0</difficult>
		<bndbox>
		<xmin>448</xmin>
		<ymin>177</ymin>
		<xmax>481</xmax>
		<ymax>206</ymax>
		</bndbox>
	</object>
</annotation>
四、PNG 转 JPG
KITTI的图片是PNG的格式,为了方便之后的处理,我先统一转成JPG格式(faster Rcnn默认JPG)。当然可以不转,不过后面就会有好几处代码要修改。
from PIL import Image
import cv2 as cv
import os

def PNG_JPG(PngPath):
    img = cv.imread(PngPath, 0)
    w, h = img.shape[::-1]
    infile = PngPath
    outfile = os.path.splitext(infile)[0] + ".jpg"
    img = Image.open(infile)
    # img = img.resize((int(w / 2), int(h / 2)), Image.ANTIALIAS)
    try:
        if len(img.split()) == 4:
            # prevent IOError: cannot write mode RGBA as BMP
            r, g, b, a = img.split()
            img = Image.merge("RGB", (r, g, b))
            img.convert('RGB').save(outfile, quality=70)
            os.remove(PngPath)
        else:
            img.convert('RGB').save(outfile, quality=70)
            os.remove(PngPath)
        return outfile
    except Exception as e:
        print("PNG转换JPG 错误", e)


################转换多张图片#####################

path_root = os.getcwd()
Path='/data1/training/image_2/' #图片的绝对路径
img_dir = os.listdir(Path)
for img in img_dir:
    if img.endswith('.png'):
        PngPath= Path + img
        PNG_JPG(PngPath)
img_dir = os.listdir(Path)
for img in img_dir:
    print(img)
五、类别调整
数据集中的类别有以下几种:’Car’, ’Van’, ’Truck’, ’Pedestrian’, ’Person (sit- ting)’, ’Cyclist’, ’Tram’ 和’Misc’(e.g., Trailers, Segways),除此之外,标签中还有一种‘DontCare’(毫无用处)。由于每个人的任务不同,就要做出调整,至少也得把‘DontCare’去掉。
而且为了适配faster rcnn也需要将类别开头的大写字母换成小写。
PS:代码中并没写写文件夹的生成,所以需要提前新建好相关的文件夹。
代码中设计了一个flag,目的是这样的:经常我们不需要所有的类别,但是删除其他类别的过程中会导致有些txt文件里的内容全删了,那么这个txt就需要删除,flag就是用来判断这个txt文件是否需要删除。默认flag是0,表示要删,像我这个只保留‘car’的类别,就在处理‘car’的时候转置了flag
#!/usr/bin/env python
# -*- coding: UTF-8 -*-

# modify_annotations_txt.py
import glob
import string

txt_list = glob.glob('./label_2/*.txt') # 存储Labels文件夹所有txt文件路径
def show_category(txt_list):
    category_list= []
    for item in txt_list:
        try:
            with open(item) as tdf:
                for each_line in tdf:
                    labeldata = each_line.strip().split(' ') # 去掉前后多余的字符并把其分开
                    category_list.append(labeldata[0]) # 只要第一个字段,即类别
        except IOError as ioerr:
            print('File error:'+str(ioerr))
    print(set(category_list)) # 输出集合

def merge(line):
    each_line=''
    for i in range(len(line)):
        if i!= (len(line)-1):
            each_line=each_line+line[i]+' '
        else:
            each_line=each_line+line[i] # 最后一条字段后面不加空格
    each_line=each_line+'\n'
    return (each_line)

print('before modify categories are:\n')
show_category(txt_list)

for item in txt_list:
    new_txt=[]
    try:
        with open(item, 'r') as r_tdf:
            for each_line in r_tdf:
                labeldata = each_line.strip().split(' ')

                '''if labeldata[0] in ['Truck','Van','Tram','Car']: # 合并汽车类
                    labeldata[0] = labeldata[0].replace(labeldata[0],'car')
                if labeldata[0] in ['Person_sitting','Cyclist','Pedestrian']: # 合并行人类
                    labeldata[0] = labeldata[0].replace(labeldata[0],'pedestrian')'''
                #print type(labeldata[4])
                if labeldata[4] == '0.00':
                    labeldata[4] = labeldata[4].replace(labeldata[4],'1.00')
                if labeldata[5] == '0.00':
                    labeldata[5] = labeldata[5].replace(labeldata[5],'1.00')
                if labeldata[0] == 'Truck':
                    labeldata[0] = labeldata[0].replace(labeldata[0],'truck')
                if labeldata[0] == 'Van':
                    labeldata[0] = labeldata[0].replace(labeldata[0],'van')
                if labeldata[0] == 'Tram':
                    labeldata[0] = labeldata[0].replace(labeldata[0],'tram')
                if labeldata[0] == 'Car':
                    labeldata[0] = labeldata[0].replace(labeldata[0],'car')
                #if labeldata[0] == 'Cyclist':
                    #labeldata[0] = labeldata[0].replace(labeldata[0],'cyclist')
                if labeldata[0] in ['Person_sitting','Pedestrian']: # 合并行人类
                    labeldata[0] = labeldata[0].replace(labeldata[0],'pedestrian')
                if labeldata[0] == 'Cyclist':
                    continue
                if labeldata[0] == 'DontCare': # 忽略Dontcare类
                    continue
                if labeldata[0] == 'Misc': # 忽略Misc类
                    continue
                new_txt.append(merge(labeldata)) # 重新写入新的txt文件
        with open(item,'w+') as w_tdf: # w+是打开原文件将内容删除,另写新内容进去
            for temp in new_txt:
                w_tdf.write(temp)
    except IOError as ioerr:
        print('File error:'+str(ioerr))

print('\nafter modify categories are:\n')
newtxt_list = glob.glob('./label_2/*.txt')
show_category(newtxt_list)
六、TXT 转 XML
首先也是需要新建好代码中提到的文件夹,然后就是要修改类别参数(和上一步是对应的,有几类就写几类),最后就是填好图像文件所在的路径。
#!/usr/bin/env python
# -*- coding: UTF-8 -*-
# txt_to_xml.py
# 根据一个给定的XML Schema,使用DOM树的形式从空白文件生成一个XML
from xml.dom.minidom import Document
import cv2
import os

def generate_xml(name,split_lines,img_size,class_ind):
    doc = Document()  # 创建DOM文档对象

    annotation = doc.createElement('annotation')
    doc.appendChild(annotation)

    title = doc.createElement('folder')
    title_text = doc.createTextNode('VOC2007')#这里修改了文件夹名
    title.appendChild(title_text)
    annotation.appendChild(title)

    img_name=name+'.jpg'#要用jpg格式


    title = doc.createElement('filename')
    title_text = doc.createTextNode(img_name)
    title.appendChild(title_text)
    annotation.appendChild(title)

    source = doc.createElement('source')
    annotation.appendChild(source)

    title = doc.createElement('database')
    title_text = doc.createTextNode('The VOC2007 Database')#修改为VOC
    title.appendChild(title_text)
    source.appendChild(title)

    title = doc.createElement('annotation')
    title_text = doc.createTextNode('PASCAL VOC2007')#修改为VOC
    title.appendChild(title_text)
    source.appendChild(title)

    size = doc.createElement('size')
    annotation.appendChild(size)

    title = doc.createElement('width')
    title_text = doc.createTextNode(str(img_size[1]))
    title.appendChild(title_text)
    size.appendChild(title)

    title = doc.createElement('height')
    title_text = doc.createTextNode(str(img_size[0]))
    title.appendChild(title_text)
    size.appendChild(title)

    title = doc.createElement('depth')
    title_text = doc.createTextNode(str(img_size[2]))
    title.appendChild(title_text)
    size.appendChild(title)

    for split_line in split_lines:
        line=split_line.strip().split()
        if line[0] in class_ind:
            object = doc.createElement('object')
            annotation.appendChild(object)

            title = doc.createElement('name')
            title_text = doc.createTextNode(line[0])
            title.appendChild(title_text)
            object.appendChild(title)

            title = doc.createElement('difficult')
            title_text = doc.createTextNode('0')
            title.appendChild(title_text)
            object.appendChild(title)

            bndbox = doc.createElement('bndbox')
            object.appendChild(bndbox)
            title = doc.createElement('xmin')
            title_text = doc.createTextNode(str(int(float(line[4]))))
            title.appendChild(title_text)
            bndbox.appendChild(title)
            title = doc.createElement('ymin')
            title_text = doc.createTextNode(str(int(float(line[5]))))
            title.appendChild(title_text)
            bndbox.appendChild(title)
            title = doc.createElement('xmax')
            title_text = doc.createTextNode(str(int(float(line[6]))))
            title.appendChild(title_text)
            bndbox.appendChild(title)
            title = doc.createElement('ymax')
            title_text = doc.createTextNode(str(int(float(line[7]))))
            title.appendChild(title_text)
            bndbox.appendChild(title)

    # 将DOM对象doc写入文件
    f = open('/data1/faster-rcnn.pytorch/data/VOCdevkit/VOC2007/Annotations/'+name+'.xml','w')   # Annotations/
    #f = open('Annotations/'+name+'.xml','w')
    f.write(doc.toprettyxml(indent = ''))
    f.close()

if __name__ == '__main__':
    class_ind=('van', 'tram', 'car', 'pedestrian', 'truck')#修改为了5类
    cur_dir=os.getcwd()
    print(cur_dir) #wjg
    labels_dir=os.path.join(cur_dir,'label_2')
    print(labels_dir)  #wjg
    for parent, dirnames, filenames in os.walk(labels_dir): # 分别得到根目录,子目录和根目录下文件
        for file_name in filenames:
            full_path=os.path.join(parent, file_name) # 获取文件全路径
            #print full_path
            print(full_path) # wjg
            f=open(full_path)
            split_lines = f.readlines()
            name= file_name[:-4] # 后四位是扩展名.txt,只取前面的文件名
            #print name
            img_name=name+'.jpg'
            img_path=os.path.join('/data1/faster-rcnn.pytorch/data/VOCdevkit/VOC2007/JPEGImages',img_name) # 路径需要自行修改
            #print img_path
            # wjg
            print("img_path",img_path)
            img_size=cv2.imread(img_path).shape
            generate_xml(name,split_lines,img_size,class_ind)
print('all txts has converted into xmls')
七、生成检索txt文件
在faster rcnn中文件夹ImageSets/Main和ImageSets/Layout中是用来存放检索训练测试数据的txt文件。因此,我们要根据新的label_2中的txt文件来划分。除了要提前建好文件夹之外,要修改的地方就是类别来,也是要和之前的匹配。
# create_train_test_txt.py
# encoding:utf-8
import pdb
import glob
import os
import random
import math

def get_sample_value(txt_name, category_name):
    label_path = './label_2/'
    txt_path = label_path + txt_name+'.txt'
    try:
        with open(txt_path) as r_tdf:
            if category_name in r_tdf.read():
                return ' 1'
            else:
                return '-1'
    except IOError as ioerr:
        print('File error:'+str(ioerr))

txt_list_path = glob.glob('./label_2/*.txt')
txt_list = []

for item in txt_list_path:
    temp1,temp2 = os.path.splitext(os.path.basename(item))
    txt_list.append(temp1)
txt_list.sort()
print(txt_list, end = '\n\n')

# 有博客建议train:val:test=8:1:1,先尝试用一下
num_trainval = random.sample(txt_list, math.floor(len(txt_list)*9/10.0)) # 可修改百分比
num_trainval.sort()
print(num_trainval, end = '\n\n')

num_train = random.sample(num_trainval,math.floor(len(num_trainval)*8/9.0)) # 可修改百分比
num_train.sort()
print(num_train, end = '\n\n')

num_val = list(set(num_trainval).difference(set(num_train)))
num_val.sort()
print(num_val, end = '\n\n')

num_test = list(set(txt_list).difference(set(num_trainval)))
num_test.sort()
print(num_test, end = '\n\n')

# pdb.set_trace()  # wjg

Main_path = '/data1/faster-rcnn.pytorch/data/VOCdevkit/VOC2007/ImageSets/Main/'
train_test_name = ['trainval','train','val','test']
category_name = ['van', 'tram', 'car', 'pedestrian', 'truck']#修改类别

# 循环写trainvl train val test
for item_train_test_name in train_test_name:
    list_name = 'num_'
    list_name += item_train_test_name
    train_test_txt_name = Main_path + item_train_test_name + '.txt'
    try:
        # 写单个文件
        with open(train_test_txt_name, 'w') as w_tdf:
            # 一行一行写
            for item in eval(list_name):
                w_tdf.write(item+'\n')
        # 循环写Car Pedestrian Cyclist
        for item_category_name in category_name:
            category_txt_name = Main_path + item_category_name + '_' + item_train_test_name + '.txt'
            with open(category_txt_name, 'w') as w_tdf:
                # 一行一行写
                for item in eval(list_name):
                    w_tdf.write(item+' '+ get_sample_value(item, item_category_name)+'\n')
    except IOError as ioerr:
        print('File error:'+str(ioerr))
然后就可以得到一大堆的文件,将这些都复制到ImageSets/Main和ImageSets/Layout,准备工作就做完了。
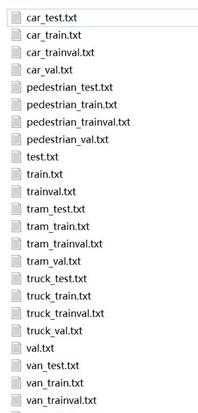
当然在训练过程中可能会出现其他问题,具体将在之后的博客faster-rcnn.pytorch-1.0指南(四)——训练自己的数据集中做介绍。
更多推荐



 3
3 0
0- 0


 已为社区贡献1条内容

所有评论(0)