
【爆肝了!YOLOv8 实战教程】从 0 到 1 搞定目标检测,5 分钟让你的电脑 “看懂“ 世界!
YOLOv8目标检测保姆级教程:从安装到实战 本教程为零基础用户提供YOLOv8目标检测的完整使用指南。首先需安装ultralytics库(pip install ultralytics),然后下载预训练模型(如yolov8n.pt)。教程详细演示了如何加载模型、处理图片/视频流,并解析检测结果(包含目标位置、类别和置信度)。最后提供了完整代码示例,展示如何为检测到的目标绘制边界框和标签。操作简单
前言:
家人们!今天必须给你们安利一个超酷的技能 —— 用 YOLOv8 做目标检测!简单说就是让电脑像人一样 "看见" 东西,比如从照片里找出猫猫狗狗、汽车行人... 全程保姆级教学,哪怕你是编程小白也能学会,看完直接上手秀操作!
一、先把 "武器" 准备好
咱们搞目标检测,第一步得把工具配齐。就像做饭得先买锅碗瓢盆,这里咱们需要一个叫ultralytics的 Python 库,它里面藏着 YOLO 的全套工具。
打开你的命令行:
pip install ultralytics二、 下载模型
YOLOv8 就像一个 "视力超棒的大脑",但这个大脑需要先 "学习" 过才能工作。官方已经帮咱们训练好了一些模型,直接拿来用就行!
模型在哪领?看这里!!!!
https://docs.ultralytics.com/models/yolov8/#performance-metrics
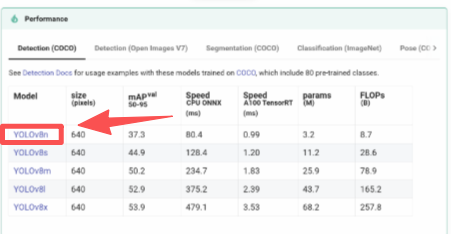
里面有不同大小的模型,比如yolov8n.pt(n 代表 nano,小巧快速,适合新手练手)、yolov8x.pt(x 代表超大,精度高但吃电脑配置)。咱们新手就先拿yolov8n.pt试试水,代码里会自动下载,不用自己手动找~
三、官方 "说明书"
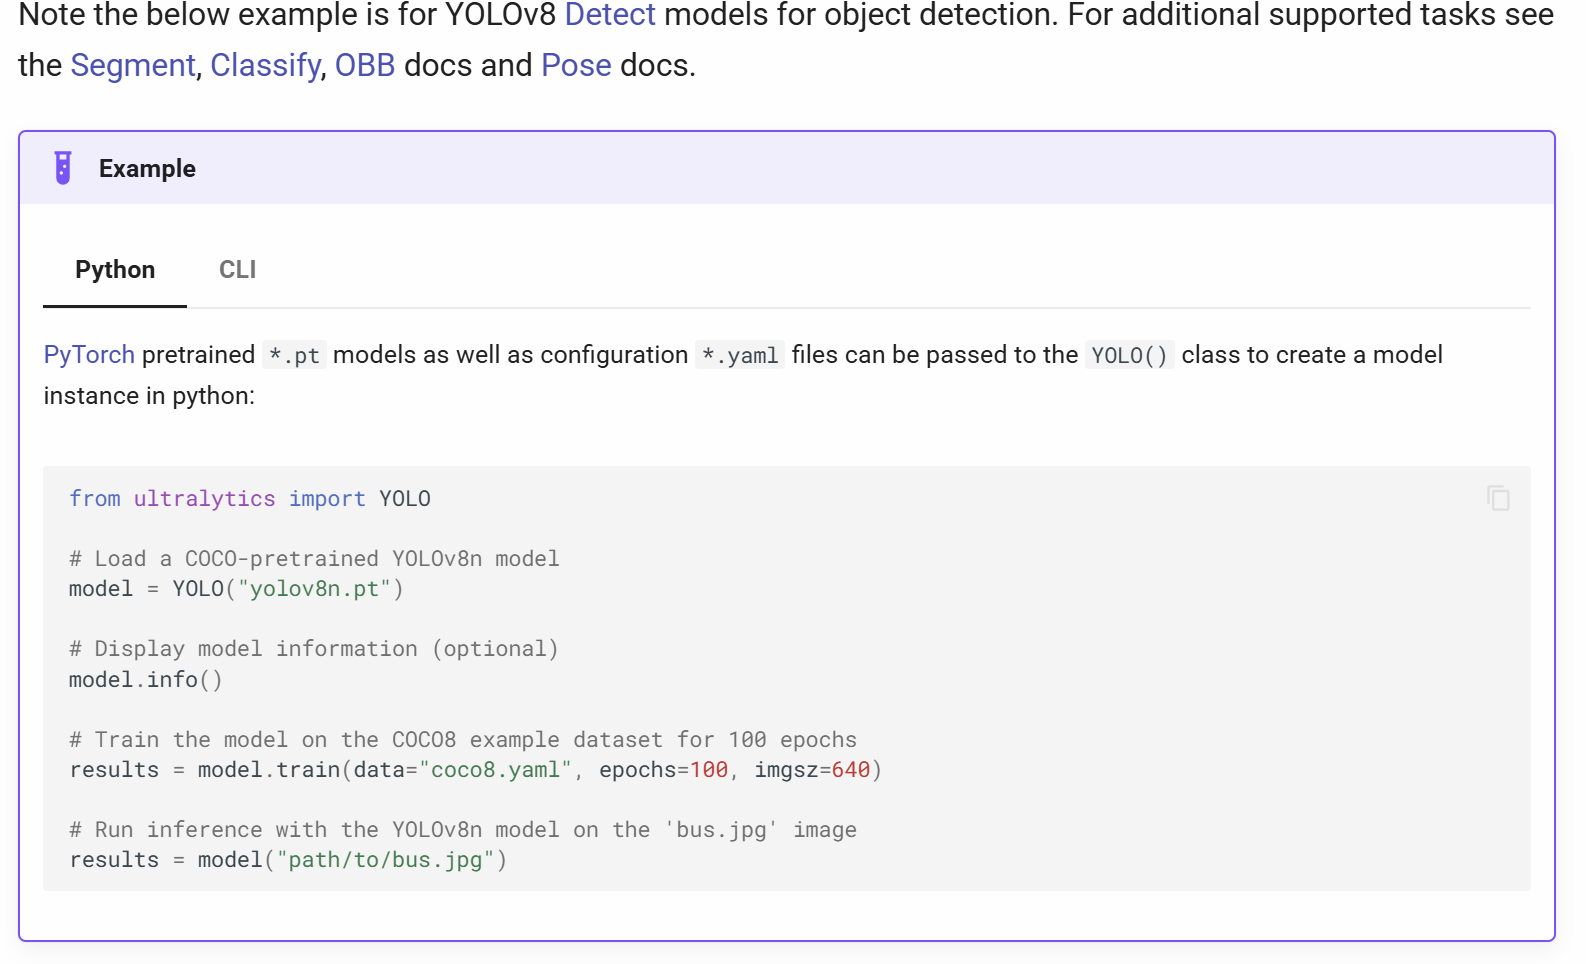
3.1 怎么加载模型?
就像打开软件一样,几行代码搞定:
from ultralytics import YOLO
# Load a COCO-pretrained YOLOv8n model
model = YOLO("yolov8n.pt")
# Display model information (optional)
model.info()
运行后会显示模型有多少层、多少参数,相当于告诉你 "这个大脑有多厉害"~
3.2 怎么让模型 "看图"?
模型加载好了,就得让它干活了!不管是单张图片、整个文件夹的图,甚至摄像头实时画面,它都能处理。
https://docs.ultralytics.com/usage/python/#predict
举几个例子:
import cv2
from PIL import Image

from ultralytics import YOLO

model = YOLO("model.pt")
# accepts all formats - image/dir/Path/URL/video/PIL/ndarray. 0 for webcam
results = model.predict(source="0")
results = model.predict(source="folder", show=True)  # Display preds. Accepts all YOLO predict arguments

# from PIL
im1 = Image.open("bus.jpg")
results = model.predict(source=im1, save=True)  # save plotted images

# from ndarray
im2 = cv2.imread("bus.jpg")
results = model.predict(source=im2, save=True, save_txt=True)  # save predictions as labels

# from list of PIL/ndarray
results = model.predict(source=[im1, im2])
是不是很灵活?想让它看啥就看啥~
四、模型 "看" 完后,结果里藏着啥?
当模型处理完图片,会返回一个results对象,这里面全是 "机密信息"—— 比如检测到了什么东西、在哪个位置、可信度多少。
咱们来扒一扒它的 "家底":
-
boxes:最核心的部分,存着每个目标的坐标(左上角 x1,y1,右下角 x2,y2)、类别 ID、置信度 -
names:类别名字对照表,比如 0 代表 "人",2 代表 "车"(足足 80 个类别,从动物到家具都有) -
orig_img:原始图片的像素数据,想二次加工就靠它 -
speed:处理速度明细,包括预处理、推理、后处理各花了多少毫秒(看看你电脑够不够快)
举个实际输出的例子:
1 YOLOv8n summary: 129 layers, 3,157,200 parameters, 0 gradients, 8.9 GFLOPs

0: 640x640 4 cars, 1 truck, 291.9ms
Speed: 6.0ms preprocess, 291.9ms inference, 2.2ms postprocess per image at shape (1, 3, 640, 640)
ultralytics.engine.results.Results object with attributes:

2 boxes: ultralytics.engine.results.Boxes object
keypoints: None
masks: None
names: {0: 'person', 1: 'bicycle', 2: 'car', 3: 'motorcycle', 4: 'airplane', 5: 'bus', 6: 'train', 7: 'truck', 8: 'boat', 9: 'traffic light', 10: 'fire hydrant', 11: 'stop sign', 12: 'parking meter', 13: 'bench', 14: 'bird', 15: 'cat', 16: 'dog', 17: 'horse', 18: 'sheep', 19: 'cow', 20: 'elephant', 21: 'bear', 22: 'zebra', 23: 'giraffe', 24: 'backpack', 25: 'umbrella', 26: 'handbag', 27: 'tie', 28: 'suitcase', 29: 'frisbee', 30: 'skis', 31: 'snowboard', 32: 'sports ball', 33: 'kite', 34: 'baseball bat', 35: 'baseball glove', 36: 'skateboard', 37: 'surfboard', 38: 'tennis racket', 39: 'bottle', 40: 'wine glass', 41: 'cup', 42: 'fork', 43: 'knife', 44: 'spoon', 45: 'bowl', 46: 'banana', 47: 'apple', 48: 'sandwich', 49: 'orange', 50: 'broccoli', 51: 'carrot', 52: 'hot dog', 53: 'pizza', 54: 'donut', 55: 'cake', 56: 'chair', 57: 'couch', 58: 'potted plant', 59: 'bed', 60: 'dining table', 61: 'toilet', 62: 'tv', 63: 'laptop', 64: 'mouse', 65: 'remote', 66: 'keyboard', 67: 'cell phone', 68: 'microwave', 69: 'oven', 70: 'toaster', 71: 'sink', 72: 'refrigerator', 73: 'book', 74: 'clock', 75: 'vase', 76: 'scissors', 77: 'teddy bear', 78: 'hair drier', 79: 'toothbrush'}
obb: None
orig_img: array([[[251, 254, 238],
        [251, 254, 238],
        [251, 254, 238],
        ...,
        [171, 167, 114],
        [171, 167, 114],
        [171, 167, 114]],

       [[251, 254, 238],
        [251, 254, 238],
        [251, 254, 238],
        ...,
        [170, 166, 113],
        [170, 166, 113],
        [170, 166, 113]],

       [[250, 253, 237],
        [250, 253, 237],
        [250, 253, 237],
        ...,
        [169, 165, 112],
        [169, 165, 112],
        [169, 165, 112]],

       ...,

       [[ 73,  87, 109],
        [ 78,  92, 114],
        [ 85,  99, 121],
        ...,
        [  4,  18,   7],
        [ 10,  26,  15],
        [ 13,  29,  18]],

       [[ 70,  84, 106],
        [ 73,  87, 109],
        [ 80,  94, 116],
        ...,
        [  4,  18,   7],
        [ 12,  26,  15],
        [ 17,  31,  20]],

       [[ 70,  84, 106],
        [ 69,  83, 105],
        [ 72,  86, 108],
        ...,
        [  5,  19,   8],
        [ 13,  27,  16],
        [ 19,  33,  22]]], shape=(1792, 1792, 3), dtype=uint8)
orig_shape: (1792, 1792)
path: 'image0.jpg'
probs: None
save_dir: 'C:\\Users\\vivi\\Desktop\\Q06\\7-yolo\\runs\\detect\\predict'
speed: {'preprocess': 6.010099983541295, 'inference': 291.86150000896305, 'postprocess': 2.2231000184547156}
一目了然,连处理速度都给你算得明明白白~
最终代码
实战!给图片里的目标 "画框框"
光知道理论没用,咱们直接上完整代码,给图片里的目标标上框,再写上名字和可信度,成就感拉满!
完整代码(抄作业就行):
# 1 1张图的目标检测

from ultralytics import YOLO
import cv2 as cv
# import numpy as np
# 1 加载预训练模型 YOLOv8n
# Load a COCO-pretrained YOLOv8n model
model = YOLO("yolov8n.pt")

# 查看模型信息
# Display model information (optional)
model.info()
# print()

# 2 读取图片
img = cv.imread("images/test1.jpg")

# 3 图片中的目标检测
results = model.predict(img)

# print(results)
"""
1 name
2 conf
3 x,y,w,h

"""

colorYOLO = (0,200,0)
for result in results:
    # print(result)
    # print(result.boxes)
     for i in result.boxes:
        # 3.1 获得分类id
        classid = i.cpu().cls.squeeze().item() # squeeze实现降维的效果 从一维张量拿到值使用item
        classname = model.names[int(classid)]
        # 3.2 获取置信度
        conf = i.cpu().conf[0].item()

        # 3.3 那坐标
        # x1,y1,x2,y2 = np.array(i.cpu().xyxy.squeeze()).astype(int)
        x1,y1,x2,y2 = i.cpu().xyxy.squeeze().numpy().astype(int)
        # print(np.array(i.cpu().xyxy.squeeze()).astype(int))
        # print(x1,y1,x2,y2)
        cv.rectangle(img,(x1,y1),(x2,y2),colorYOLO,2)
        cv.putText(img,f"{classname},{conf:.2f}%",(x1,y1-10),cv.FONT_HERSHEY_COMPLEX,1.2,colorYOLO,2)
resizeimg = cv.resize(img,None,fx=0.4,fy=0.4)
cv.imshow("showimg",resizeimg)
        #   print(conf)
        #   print(classid,classname)

while True:
    code = cv.waitKey(0) & 0xFF
    if code ==27:
        break
cv.destroyAllWindows()
运行结果: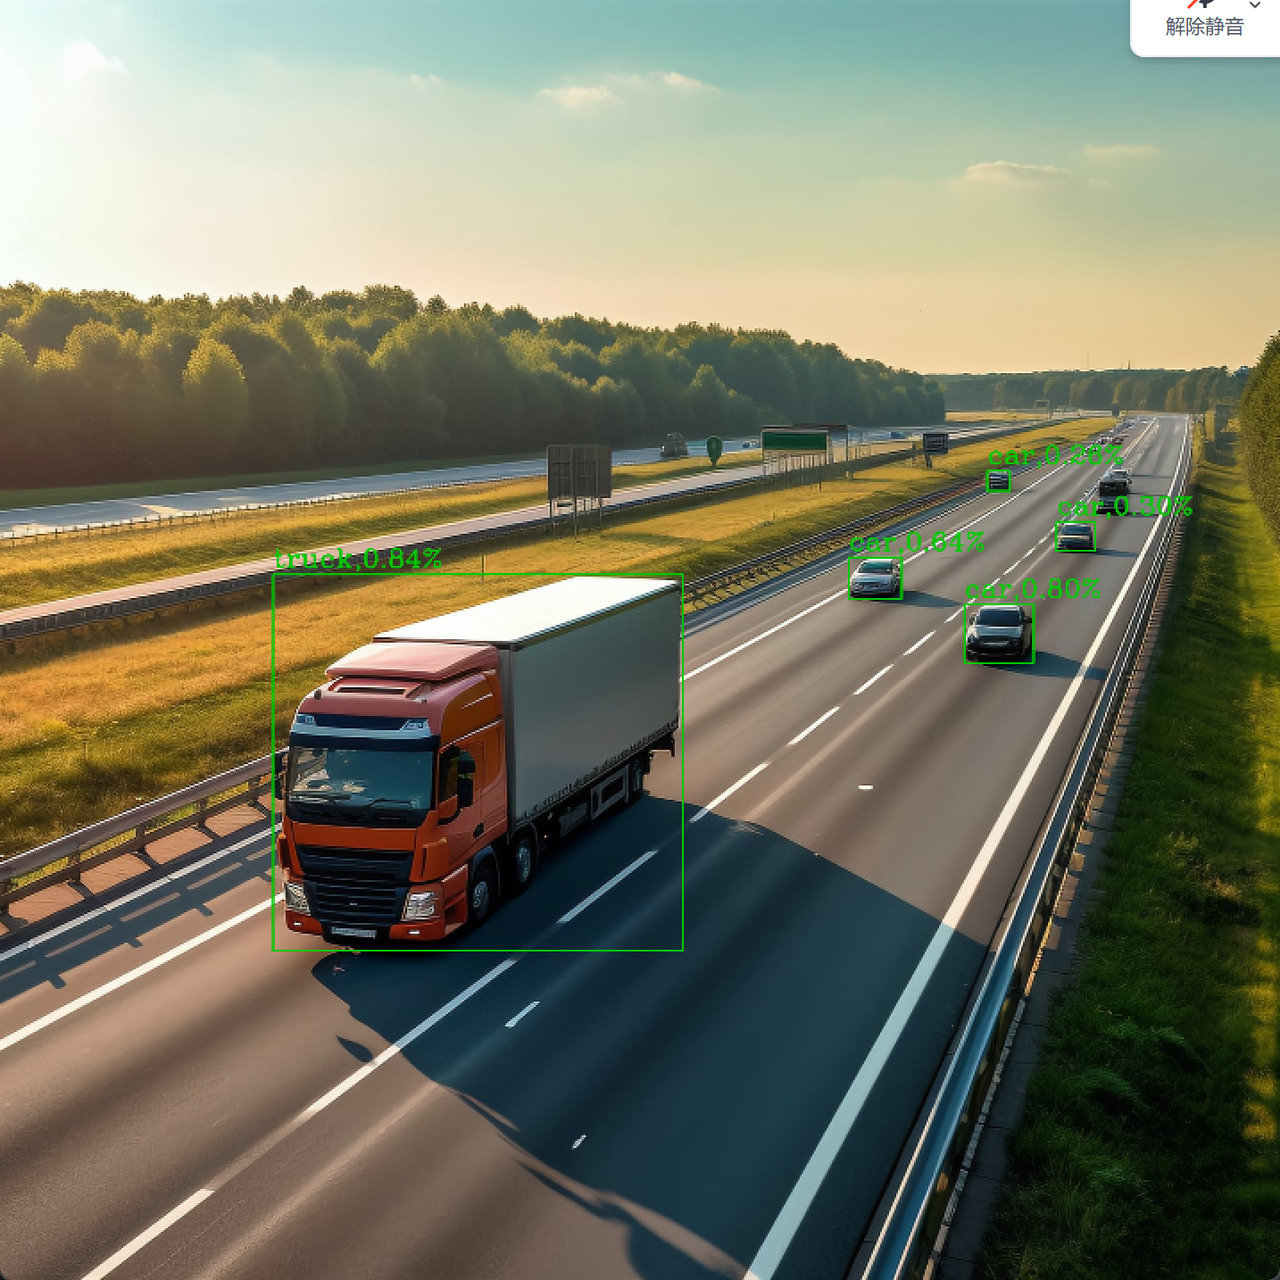
代码说明(小白必看):
- 记得把
"images/test1.jpg"换成你自己的图片路径,比如"test.png"(图片和代码放一个文件夹里最方便) - 颜色
(0,200,0)是绿色,想换颜色的话,比如红色是(0,0,255),蓝色是(255,0,0)(OpenCV 的颜色格式是 BGR,别搞反了) - 缩放比例
fx=0.4, fy=0.4可以自己调,图片小就调大(比如 1.0),图片大就调小
最后说两句
YOLOv8 真的是目标检测里的 "扛把子",速度快、效果好,关键是用起来还简单!今天这个教程从环境搭建到实战代码都给你们安排得明明白白,跟着敲一遍,保证你也能让电脑 "看懂" 世界~
如果运行的时候遇到问题,评论区喊我,咱们一起解决!觉得有用的话,别忘了点赞收藏,下次想练手了直接翻出来用~冲鸭!
更多推荐

 6
6 0
0- 0


 已为社区贡献1条内容

所有评论(0)