
【基于深度学习_yolov5的课堂行为检测 6种行为 可识别hand-raising_reading_writing_using phone_bowing the head_leaning over
基于深度学习/yolov5的课堂行为检测6种行为可识别hand-raising/reading/writing/using phone/bowing the head/leaning over the table/共6种
基于深度学习/yolov5的课堂行为检测
6种行为
可识别hand-raising/reading/writing/using phone/bowing the head/leaning over the table/共6种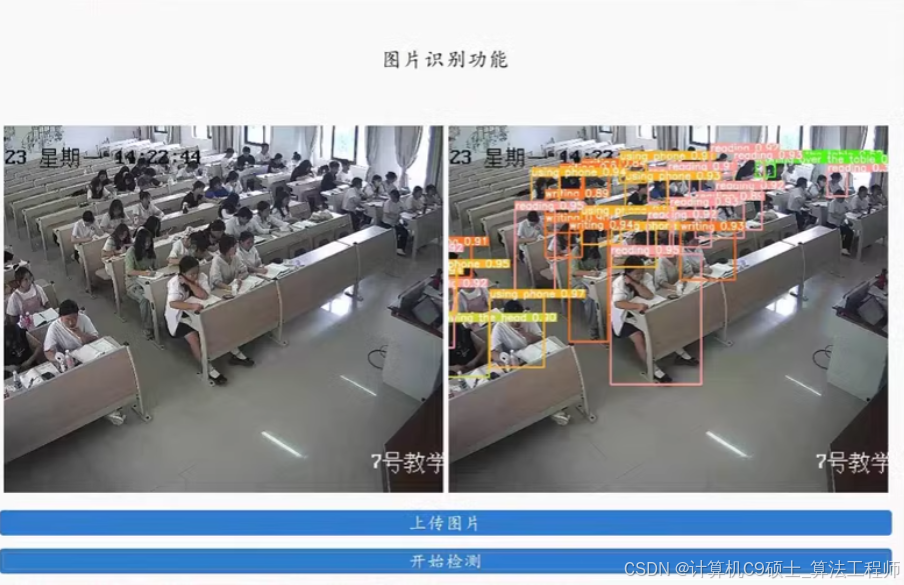
基于YOLOv5的课堂行为检测项目的详细介绍,包括数据集准备、模型训练、推理和可视化。该项目可以识别以下6种行为:举手(hand-raising)、阅读(reading)、书写(writing)、使用手机(using phone)、低头(bowing the head)、趴在桌子上(leaning over the table)。
项目结构
深色版本
ClassroomBehaviorDetection/
├── data/
│ ├── images/
│ │ ├── train/
│ │ ├── val/
│ │ └── test/
│ └── labels/
│ ├── train/
│ ├── val/
│ └── test/
├── models/
│ └── yolov5/
├── utils/
│ ├── data_loader.py
│ ├── metrics.py
│ └── plot.py
├── main.py
├── train.py
├── infer.py
└── README.md
- 数据集准备
数据集格式
假设你的数据集已经标注好,并且格式为YOLOv5所需的格式。每个图像对应一个.txt文件,包含目标框的坐标和类别标签。
数据集目录结构
深色版本
data/
├── images/
│ ├── train/
│ ├── val/
│ └── test/
└── labels/
├── train/
├── val/
└── test/
数据集划分
确保你的数据集已经划分为训练集、验证集和测试集。例如,train目录下的图像和标签用于训练,val目录下的用于验证,test目录下的用于测试。
- 安装YOLOv5
首先,克隆YOLOv5仓库并安装必要的依赖项:
bash
深色版本
cd models/
git clone https://github.com/ultralytics/yolov5.git
cd yolov5
pip install -r requirements.txt
3. 数据配置文件
创建一个数据配置文件data/classroom_behavior.yaml,指定数据集路径和类别信息:
yaml
深色版本
train: …/data/images/train/
val: …/data/images/val/
test: …/data/images/test/
nc: 6 # 类别数量
names:
- hand-raising
- reading
- writing
- using phone
- bowing the head
- leaning over the table
- 训练模型
编写一个训练脚本train.py:
python
深色版本
import os
import torch
from yolov5 import train
def main():
# 设置训练参数
data_yaml = ‘…/data/classroom_behavior.yaml’
model_yaml = ‘yolov5s.yaml’
epochs = 100
batch_size = 16
img_size = 640
device = ‘cuda’ if torch.cuda.is_available() else ‘cpu’
# 开始训练
train.run(data=data_yaml, model=model_yaml, epochs=epochs, batch=batch_size, imgsz=img_size, device=device)
if name == ‘main’:
main()
运行训练脚本:
bash
深色版本
python train.py
5. 推理和可视化
编写一个推理脚本infer.py,用于加载训练好的模型并对新图像进行预测:
python
深色版本
import os
import torch
import cv2
import numpy as np
from yolov5.models.experimental import attempt_load
from yolov5.utils.general import non_max_suppression, scale_coords
from yolov5.utils.plots import Annotator
def load_model(weights_path, device):
model = attempt_load(weights_path, map_location=device)
model.eval()
return model
def infer_image(model, img_path, img_size, device):
img = cv2.imread(img_path)
img = cv2.cvtColor(img, cv2.COLOR_BGR2RGB)
img = cv2.resize(img, (img_size, img_size))
img = img.transpose(2, 0, 1)
img = img.astype(np.float32) / 255.0
img = torch.from_numpy(img).unsqueeze(0).to(device)
with torch.no_grad():
    pred = model(img)[0]

pred = non_max_suppression(pred, conf_thres=0.25, iou_thres=0.45)

return pred, img
def draw_boxes(img, pred, names):
annotator = Annotator(img, line_width=2, example=str(names))
for i, det in enumerate(pred):
if len(det):
det[:, :4] = scale_coords(img.shape[2:], det[:, :4], img.shape[2:]).round()
for *xyxy, conf, cls in reversed(det):
c = int(cls)
label = f’{names[c]} {conf:.2f}’
annotator.box_label(xyxy, label, color=colors(c, True))
return annotator.result()
if name == ‘main’:
weights_path = ‘runs/train/exp/weights/best.pt’
img_path = ‘…/data/images/test/000001.jpg’
img_size = 640
device = ‘cuda’ if torch.cuda.is_available() else ‘cpu’
model = load_model(weights_path, device)
pred, img = infer_image(model, img_path, img_size, device)

# 读取原始图像
original_img = cv2.imread(img_path)

# 绘制预测框
annotated_img = draw_boxes(original_img, pred, names=['hand-raising', 'reading', 'writing', 'using phone', 'bowing the head', 'leaning over the table'])

# 显示结果
cv2.imshow('Result', annotated_img)
cv2.waitKey(0)
cv2.destroyAllWindows()
- 评价指标
编写一个脚本evaluate.py来计算模型的评价指标(如IoU、mAP等):
python
深色版本
import os
import torch
from yolov5 import val
from yolov5.utils.general import check_img_size
from yolov5.utils.datasets import create_dataloader
def main():
data_yaml = ‘…/data/classroom_behavior.yaml’
weights_path = ‘runs/train/exp/weights/best.pt’
img_size = 640
batch_size = 16
device = ‘cuda’ if torch.cuda.is_available() else ‘cpu’
# 加载数据
dataloader = create_dataloader('../data/images/val/', img_size, batch_size, 32, single_cls=False, pad=0.5, rect=True)[0]

# 加载模型
model = attempt_load(weights_path, map_location=device)
model.eval()

# 验证模型
val.run(data=data_yaml, weights=weights_path, batch_size=batch_size, imgsz=img_size, device=device, dataloader=dataloader)
if name == ‘main’:
main()
运行评价脚本:
bash
深色版本
python evaluate.py
7. 可视化标注文件
编写一个脚本visualize_annotations.py来可视化标注文件:
python
深色版本
import os
import cv2
import numpy as np
def read_labels(label_path):
with open(label_path, ‘r’) as f:
lines = f.readlines()
labels = []
for line in lines:
parts = line.strip().split()
class_id = int(parts[0])
x_center = float(parts[1])
y_center = float(parts[2])
width = float(parts[3])
height = float(parts[4])
labels.append((class_id, x_center, y_center, width, height))
return labels
def draw_boxes_on_image(img_path, label_path, names):
img = cv2.imread(img_path)
labels = read_labels(label_path)
for class_id, x_center, y_center, width, height in labels:
    x = int((x_center - width / 2) * img.shape[1])
    y = int((y_center - height / 2) * img.shape[0])
    w = int(width * img.shape[1])
    h = int(height * img.shape[0])

    color = (0, 255, 0)
    cv2.rectangle(img, (x, y), (x + w, y + h), color, 2)
    label = names[class_id]
    cv2.putText(img, label, (x, y - 10), cv2.FONT_HERSHEY_SIMPLEX, 0.9, color, 2)

return img
if name == ‘main’:
img_path = ‘…/data/images/val/000001.jpg’
label_path = ‘…/data/labels/val/000001.txt’
names = [‘hand-raising’, ‘reading’, ‘writing’, ‘using phone’, ‘bowing the head’, ‘leaning over the table’]
annotated_img = draw_boxes_on_image(img_path, label_path, names)

cv2.imshow('Annotated Image', annotated_img)
cv2.waitKey(0)
cv2.destroyAllWindows()
- 运行项目
确保数据集和标签文件已经准备好,并放在相应的目录中。
运行训练脚本:
bash
深色版本
python train.py
运行推理脚本:
bash
深色版本
python infer.py
运行评价脚本:
bash
深色版本
python evaluate.py
运行可视化标注文件脚本:
bash
深色版本
python visualize_annotations.py - 代码说明
数据集准备:确保数据集已经标注好,并且格式为YOLOv5所需的格式。
训练模型:使用train.py脚本训练模型,指定数据配置文件和训练参数。
推理和可视化:使用infer.py脚本加载训练好的模型并对新图像进行预测,使用visualize_annotations.py脚本可视化标注文件。
评价指标:使用evaluate.py脚本计算模型的评价指标。
希望这些代码和说明能帮助你完成基于YOLOv5的课堂行为检测项目。
更多推荐
 8
8 0
0- 0


 已为社区贡献14条内容

所有评论(0)