
基于yolov/opencv深度学习算法车道线分割/车辆检测识别系统
基于yolov/opencv深度学习算法车道线分割/车辆检测识别系统采用yolov5+霍夫变换实现车道线的检测传统图像处理方式检测车道线,
·
基于yolov/opencv深度学习算法车道线分割/车辆检测识别系统
采用yolov5+霍夫变换实现车道线的检测
传统图像处理方式检测车道线,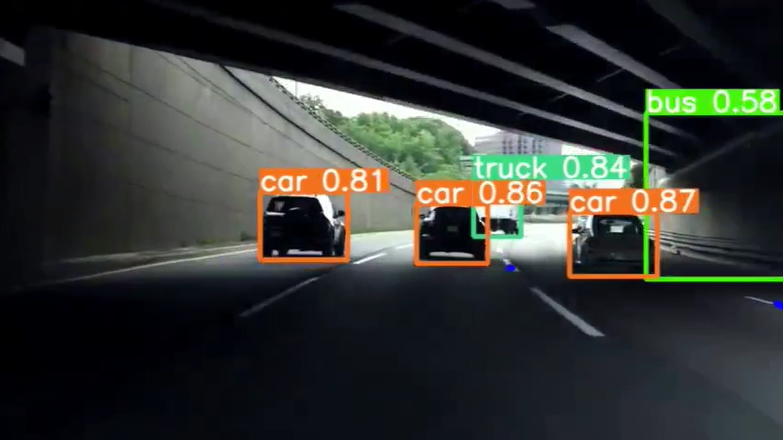
以下文字及示例代码仅供参考!
基于YOLO(You Only Look Once)和OpenCV的深度学习算法可以用来实现车道线分割和车辆检测识别系统。这种系统通常用于自动驾驶汽车或高级驾驶辅助系统(ADAS)中,以提高行车安全性和效率。下面我将分别介绍如何使用YOLO进行车辆检测以及如何结合OpenCV进行车道线分割,并附上简化的代码示例。
车辆检测 - 使用YOLO
YOLO是一种实时对象检测系统,它将图像划分为一个网格,并预测每个网格中的边界框及其置信度分数。为了检测车辆,你需要预先训练好的YOLO模型权重(如YOLOv3、YOLOv4或YOLOv5),这些权重可以在COCO数据集上预训练,该数据集包括了“car”类别。
步骤:
- 加载YOLO模型:使用预训练的YOLO模型。
- 输入图像或视频帧:对每一帧执行对象检测。
- 非极大值抑制(NMS):去除重叠的检测框。
- 显示结果:在图像上绘制检测到的车辆边界框。
简化代码示例:
import cv2
import numpy as np

# 加载YOLOv3配置和权重文件
net = cv2.dnn.readNet("yolov3.weights", "yolov3.cfg")
layer_names = net.getLayerNames()
output_layers = [layer_names[i[0] - 1] for i in net.getUnconnectedOutLayers()]

# 加载COCO标签
with open("coco.names", "r") as f:
    classes = [line.strip() for line in f.readlines()]

# 加载图像
img = cv2.imread('image.jpg')
height, width, channels = img.shape

# 检测物体
blob = cv2.dnn.blobFromImage(img, 0.00392, (416, 416), (0, 0, 0), True, crop=False)
net.setInput(blob)
outs = net.forward(output_layers)

# 显示信息到屏幕
for out in outs:
    for detection in out:
        scores = detection[5:]
        class_id = np.argmax(scores)
        confidence = scores[class_id]
        if confidence > 0.5 and classes[class_id] == 'car':
            # 物体检测
            center_x = int(detection[0] * width)
            center_y = int(detection[1] * height)
            w = int(detection[2] * width)
            h = int(detection[3] * height)
            x = int(center_x - w / 2)
            y = int(center_y - h / 2)
            cv2.rectangle(img, (x, y), (x + w, y + h), (0, 255, 0), 2)

cv2.imshow("Image", img)
cv2.waitKey(0)
cv2.destroyAllWindows()
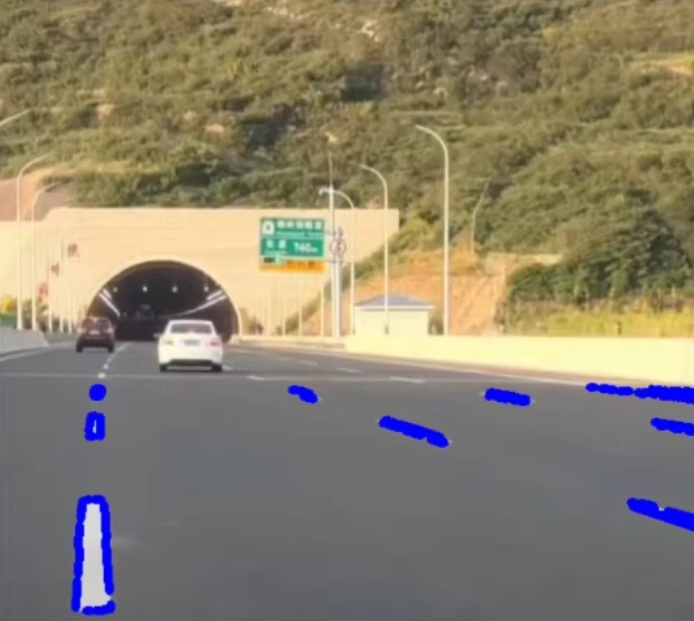
车道线分割 - 使用OpenCV
对于车道线分割,常用的技术是霍夫变换或者更复杂的卷积神经网络(CNN)。这里我们采用一种基于颜色过滤和边缘检测的方法,这是一种相对简单的方法。
步骤:
- 转换色彩空间:从RGB转换到HSV以便于颜色过滤。
- 应用阈值:创建二值图来突出车道线。
- 边缘检测:使用Canny边缘检测算法。
- 霍夫变换:检测图像中的直线。
简化代码示例:
import cv2
import numpy as np

def region_of_interest(img, vertices):
    mask = np.zeros_like(img)
    cv2.fillPoly(mask, vertices, 255)
    masked_image = cv2.bitwise_and(img, mask)
    return masked_image

def draw_lines(img, lines):
    if lines is None:
        return
    for line in lines:
        for x1,y1,x2,y2 in line:
            cv2.line(img, (x1, y1), (x2, y2), (0, 255, 0), 5)

image = cv2.imread('road.jpg')
hsv = cv2.cvtColor(image, cv2.COLOR_BGR2HSV)
lower_blue = np.array([60,40,40])
upper_blue = np.array([150,255,255])
mask = cv2.inRange(hsv, lower_blue, upper_blue)

edges = cv2.Canny(mask, 50, 150)
cropped_edges = region_of_interest(edges, np.array([[(0,imshape[0]),(450, 300), (550, 300), (imshape[1],imshape[0])]], dtype=np.int32))
lines = cv2.HoughLinesP(cropped_edges, 1, np.pi/180, 50, minLineLength=100, maxLineGap=150)
draw_lines(image, lines)

cv2.imshow('result', image)
cv2.waitKey(0)
cv2.destroyAllWindows()
请注意,上述代码需要根据实际情况调整参数,比如颜色范围、Canny边缘检测的阈值等。此外,实际应用可能需要更复杂的模型和算法来提高准确性和鲁棒性。
更多推荐
 5
5 0
0- 0


 已为社区贡献5条内容

所有评论(0)