
深度学习-循环神经网络(LSTM)
一句话介绍LSTM,它是RNN的进阶版,如果说RNN的最大限度是理解一句话,那么LSTM的最大限度则是理解一段话,详细介绍如下:LSTM,全称为长短期记忆网络(Long Short Term Memory networks),是一种特殊的RNN,能够学习到长期依赖关系。LSTM由Hochreiter & Schmidhuber (1997)提出,许多研究者进行了一系列的工作对其改进并使之发扬光大。
·
一句话介绍LSTM,它是RNN的进阶版,如果说RNN的最大限度是理解一句话,那么LSTM的最大限度则是理解一段话,详细介绍如下:
LSTM,全称为长短期记忆网络(Long Short Term Memory networks),是一种特殊的RNN,能够学习到长期依赖关系。LSTM由Hochreiter & Schmidhuber (1997)提出,许多研究者进行了一系列的工作对其改进并使之发扬光大。LSTM在许多问题上效果非常好,现在被广泛使用。
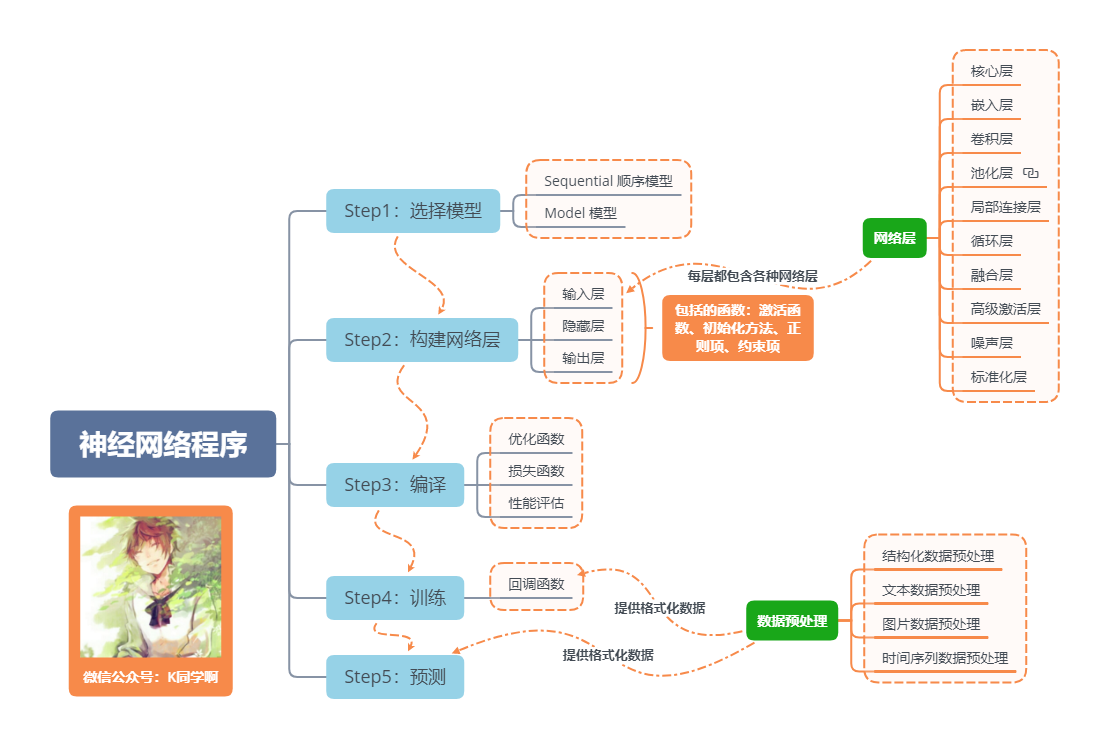
1.设置GPU
import tensorflow as tf

gpus = tf.config.list_physical_devices("GPU")

if gpus:
    tf.config.experimental.set_memory_growth(gpus[0], True)  #设置GPU显存用量按需使用
    tf.config.set_visible_devices([gpus[0]],"GPU")
2.设置相关参数
import pandas            as pd
import tensorflow        as tf
import numpy             as np
import matplotlib.pyplot as plt
# 支持中文
plt.rcParams['font.sans-serif'] = ['SimHei']  # 用来正常显示中文标签
plt.rcParams['axes.unicode_minus'] = False  # 用来正常显示负号

from numpy                 import array
from sklearn               import metrics
from sklearn.preprocessing import MinMaxScaler
from keras.models          import Sequential
from keras.layers          import Dense,LSTM,Bidirectional


# 确保结果尽可能重现
from numpy.random          import seed
seed(1)
tf.random.set_seed(1)

# 设置相关参数
n_timestamp  = 40    # 时间戳
n_epochs     = 20    # 训练轮数
# ====================================
#      选择模型:
#            1: 单层 LSTM
#            2: 多层 LSTM
#            3: 双向 LSTM
# ====================================
model_type = 1
3.加载数据
data = pd.read_csv('./datasets/SH600519.csv')  # 读取股票文件

data
	Unnamed: 0	date	open	close	high	low	volume	code
0	74	2010-04-26	88.702	87.381	89.072	87.362	107036.13	600519
1	75	2010-04-27	87.355	84.841	87.355	84.681	58234.48	600519
2	76	2010-04-28	84.235	84.318	85.128	83.597	26287.43	600519
"""
前(2426-300=2126)天的开盘价作为训练集,后300天的开盘价作为测试集
"""
training_set = data.iloc[0:2426 - 300, 2:3].values
test_set     = data.iloc[2426 - 300:, 2:3].values
四、数据预处理
1.归一化
#将数据归一化,范围是0到1
sc  = MinMaxScaler(feature_range=(0, 1))
training_set_scaled = sc.fit_transform(training_set)
testing_set_scaled  = sc.transform(test_set)
2.时间戳函数
# 取前 n_timestamp 天的数据为 X;n_timestamp+1天数据为 Y。
def data_split(sequence, n_timestamp):
    X = []
    y = []
    for i in range(len(sequence)):
        end_ix = i + n_timestamp

        if end_ix > len(sequence)-1:
            break

        seq_x, seq_y = sequence[i:end_ix], sequence[end_ix]
        X.append(seq_x)
        y.append(seq_y)
    return array(X), array(y)

X_train, y_train = data_split(training_set_scaled, n_timestamp)
X_train          = X_train.reshape(X_train.shape[0], X_train.shape[1], 1)

X_test, y_test   = data_split(testing_set_scaled, n_timestamp)
X_test           = X_test.reshape(X_test.shape[0], X_test.shape[1], 1)
五、构建模型
建构 LSTM模型
if model_type == 1:
    # 单层 LSTM
    model = Sequential()
    model.add(LSTM(units=50, activation='relu',
                   input_shape=(X_train.shape[1], 1)))
    model.add(Dense(units=1))
if model_type == 2:
    # 多层 LSTM
    model = Sequential()
    model.add(LSTM(units=50, activation='relu', return_sequences=True,
                   input_shape=(X_train.shape[1], 1)))
    model.add(LSTM(units=50, activation='relu'))
    model.add(Dense(1))
if model_type == 3:
    # 双向 LSTM
    model = Sequential()
    model.add(Bidirectional(LSTM(50, activation='relu'),
                            input_shape=(X_train.shape[1], 1)))
    model.add(Dense(1))

model.summary() # 输出模型结构
六、激活模型
history = model.fit(X_train, y_train,
                    batch_size=64,
                    epochs=n_epochs,
                    validation_data=(X_test, y_test),
                    validation_freq=1)                  #测试的epoch间隔数

model.summary()
八、结果可视化
1.绘制loss图
plt.plot(history.history['loss']    , label='Training Loss')
plt.plot(history.history['val_loss'], label='Validation Loss')
plt.title('Training and Validation Loss by K同学啊')
plt.legend()
plt.show()
2.预测
predicted_stock_price = model.predict(X_test)                        # 测试集输入模型进行预测
predicted_stock_price = sc.inverse_transform(predicted_stock_price)  # 对预测数据还原---从(0,1)反归一化到原始范围
real_stock_price      = sc.inverse_transform(y_test)# 对真实数据还原---从(0,1)反归一化到原始范围

# 画出真实数据和预测数据的对比曲线
plt.plot(real_stock_price, color='red', label='Stock Price')
plt.plot(predicted_stock_price, color='blue', label='Predicted Stock Price')
plt.title('Stock Price Prediction by K同学啊')
plt.xlabel('Time')
plt.ylabel('Stock Price')
plt.legend()
plt.show()
3.评估
"""
MSE  :均方误差    ----->  预测值减真实值求平方后求均值
RMSE :均方根误差  ----->  对均方误差开方
MAE  :平均绝对误差----->  预测值减真实值求绝对值后求均值
R2   :决定系数,可以简单理解为反映模型拟合优度的重要的统计量

详细介绍可以参考文章:https://blog.csdn.net/qq_38251616/article/details/107997435
"""
MSE   = metrics.mean_squared_error(predicted_stock_price, real_stock_price)
RMSE  = metrics.mean_squared_error(predicted_stock_price, real_stock_price)**0.5
MAE   = metrics.mean_absolute_error(predicted_stock_price, real_stock_price)
R2    = metrics.r2_score(predicted_stock_price, real_stock_price)

print('均方误差: %.5f' % MSE)
print('均方根误差: %.5f' % RMSE)
print('平均绝对误差: %.5f' % MAE)
print('R2: %.5f' % R2)
更多推荐
 0
0 0
0- 0


 已为社区贡献2条内容

所有评论(0)