
【RTDETR-MM 多模态目标检测】融合CA/ECA/GAM注意力增强
本文研究了在RTDETR-MM多模态目标检测网络中引入CA、ECA和GAM三种注意力机制的方法。通过在不同阶段(前期、中期、后期)插入注意力模块,系统分析了其对特征表达能力和检测效果的影响。实验基于FLIR数据集子集,对比了三种注意力模块在不同位置的性能表现。CA模块适合早期特征对齐,ECA模块轻量高效适合中期通道筛选,GAM模块全局建模能力强适合后期语义增强。研究提供了详细的代码实现和配置方法,
目录
4.1 RTDETR-MM前期(early)加入CA、ECA和GAM
4.2 RTDETR-MM中期(middle)加入CA、ECA和GAM
4.3RTDETR-MM中期(late)加入CA、ECA和GAM
一、引言
本文主要围绕 RTDETR-MM 多模态目标检测 展开,重点探讨在网络中引入 CA / ECA / GAM 等注意力机制的核心思路与实践。我们分别将三种注意力模块置于模态融合路径的前期、中期和后期,通过对不同插入位置进行改进与性能对比,系统分析在不同阶段引入注意力对特征表达能力与检测效果的影响。
在实验过程中,一方面我们希望通过合理的插入位置设计,尽可能增强模型的特征表征能力;另一方面也尽量控制额外参数量,在较低开销的前提下获得尽可能高的检测精度。近期已完成了大量实验并整理出相应结论,希望能够在多模态目标检测的研究与工程实践中,为大家节省一部分调参与验证的成本。
需要特别说明的是:本文所使用的数据集为 FLIR 数据集的一个子集,而非完整 FLIR 数据集,后续在复现或扩展实验时请务必留意这一点。
也期待这篇文章能为正在攻关多模态目标检测的同学提供一些有价值的参考。
二、注意力优势、结构图、代码
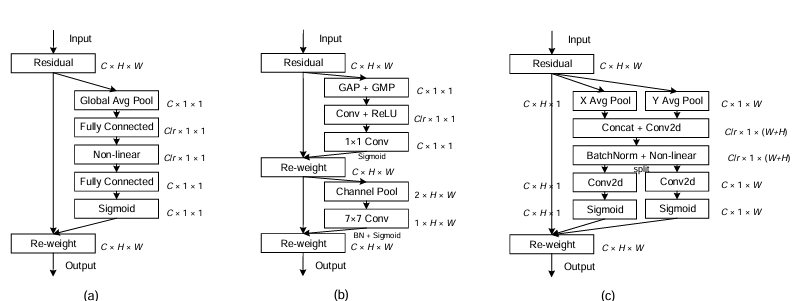
2.1 CA注意力
优势特点:
-
将通道注意力和坐标信息显式结合,沿 H、W 两个方向做聚合,既建模长程依赖,又保留精确位置信息;
-
对细粒度空间位置信息更敏感,更利于小目标、远距离目标的定位;
-
计算开销适中,相比复杂自注意力更轻量,易于插入现有网络。
在本文中的突出贡献:
-
将 CA 布置在模态融合前期,可以在刚开始对齐可见光与红外特征时,就引导网络关注“在哪儿更重要”;
-
有助于在复杂场景下压制无关区域、突出多模态一致的目标区域,为后续特征融合打下更好的空间对齐基础。
重要意义:
-
说明在多模态检测中,显式编码坐标信息的注意力对跨模态对齐和目标定位尤为关键;
-
为后续设计多模态骨干和融合模块提供了一个清晰的思路:在早期特征阶段应优先考虑带有空间先验的注意力形式。
CA核心代码:
import torch
import torch.nn as nn
import math
import torch.nn.functional as F


class h_sigmoid(nn.Module):
    def __init__(self, inplace=True):
        super(h_sigmoid, self).__init__()
        self.relu = nn.ReLU6(inplace=inplace)

    def forward(self, x):
        return self.relu(x + 3) / 6


class h_swish(nn.Module):
    def __init__(self, inplace=True):
        super(h_swish, self).__init__()
        self.sigmoid = h_sigmoid(inplace=inplace)

    def forward(self, x):
        return x * self.sigmoid(x)


class CoordAtt(nn.Module):
    def __init__(self, inp, reduction=32):
        super(CoordAtt, self).__init__()
        oup = inp
        self.pool_h = nn.AdaptiveAvgPool2d((None, 1))
        self.pool_w = nn.AdaptiveAvgPool2d((1, None))

        mip = max(8, inp // reduction)

        self.conv1 = nn.Conv2d(inp, mip, kernel_size=1, stride=1, padding=0)
        self.bn1 = nn.BatchNorm2d(mip)
        self.act = h_swish()

        self.conv_h = nn.Conv2d(mip, oup, kernel_size=1, stride=1, padding=0)
        self.conv_w = nn.Conv2d(mip, oup, kernel_size=1, stride=1, padding=0)

    def forward(self, x):
        identity = x

        n, c, h, w = x.size()
        x_h = self.pool_h(x)
        x_w = self.pool_w(x).permute(0, 1, 3, 2)

        y = torch.cat([x_h, x_w], dim=2)
        y = self.conv1(y)
        y = self.bn1(y)
        y = self.act(y)

        x_h, x_w = torch.split(y, [h, w], dim=2)
        x_w = x_w.permute(0, 1, 3, 2)

        a_h = self.conv_h(x_h).sigmoid()
        a_w = self.conv_w(x_w).sigmoid()

        out = identity * a_w * a_h

        return out
2.2 ECA注意力
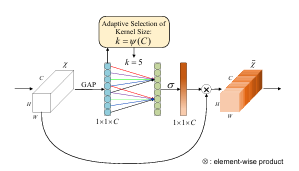
优势特点:
-
不做通道压缩,通过一维卷积实现局部跨通道交互,结构极其简洁;
-
额外参数和计算量极小,几乎不影响模型推理速度,非常适合部署场景;
-
在保持轻量的同时,能够有效突出关键通道、抑制冗余通道。
在本文中的突出贡献:
-
将 ECA 布置在模态融合中期,用于在已经对齐的多模态特征上进一步筛选“哪几类通道更有用”;
-
在几乎不增加开销的前提下,提升了特征表达的判别性,实现了精度–复杂度的更优折中。
重要意义:
-
证明了在多模态检测中,轻量级通道注意力足以带来可观收益,非常适合实际工程部署;
-
为后续在边缘设备、实时系统中引入注意力机制提供了可行范例:优先考虑类似 ECA 这类低成本模块。
ECA核心代码
import torch
from torch import nn
from torch.nn.parameter import Parameter


class ECA(nn.Module):
    """Constructs a ECA module.

    Args:
        channel: Number of channels of the input feature map
        k_size: Adaptive selection of kernel size
    """

    def __init__(self, channel, k_size=3):
        super(ECA, self).__init__()
        self.avg_pool = nn.AdaptiveAvgPool2d(1)
        self.conv = nn.Conv1d(1, 1, kernel_size=k_size, padding=(k_size - 1) // 2, bias=False)
        self.sigmoid = nn.Sigmoid()

    def forward(self, x):
        # feature descriptor on the global spatial information
        y = self.avg_pool(x)

        # Two different branches of ECA module
        y = self.conv(y.squeeze(-1).transpose(-1, -2)).transpose(-1, -2).unsqueeze(-1)

        # Multi-scale information fusion
        y = self.sigmoid(y)

        return x * y.expand_as(x)
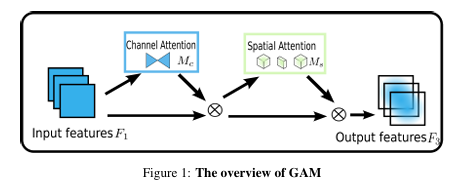
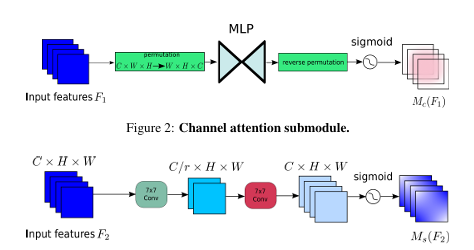
2.3 GAM注意力
优势特点:
-
同时建模全局通道依赖与空间分布,实现更充分的通道–空间交互;
-
感受野更大,对复杂背景、长距离依赖建模能力强;
-
相比单纯的 SE/CBAM 等模块,对全局上下文的利用更加充分。=
-
在本文中的突出贡献:
-
将 GAM 布置在模态融合后期/检测头前,在高层语义特征上做一次“全局重整”;
-
有助于在最终检测阶段进一步压制伪目标和背景干扰,提升对难例、拥挤场景的鲁棒性。
重要意义:
-
展示了在多模态检测框架中,在后期引入更强的全局注意力,可以显著提升上限性能;
-
为后续工作提供启示:在靠近检测头的高语义阶段,适当使用稍“重”的全局注意力模块,是提升检测质量的有效途径。
核心代码:
import torch
import torch.nn as nn

'''
https://arxiv.org/abs/2112.05561
'''


class GAM(nn.Module):
    def __init__(self, in_channels, rate=4):
        super().__init__()
        out_channels = in_channels
        in_channels = int(in_channels)
        out_channels = int(out_channels)
        inchannel_rate = int(in_channels / rate)

        self.linear1 = nn.Linear(in_channels, inchannel_rate)
        self.relu = nn.ReLU(inplace=True)
        self.linear2 = nn.Linear(inchannel_rate, in_channels)

        self.conv1 = nn.Conv2d(in_channels, inchannel_rate, kernel_size=7, padding=3, padding_mode='replicate')

        self.conv2 = nn.Conv2d(inchannel_rate, out_channels, kernel_size=7, padding=3, padding_mode='replicate')

        self.norm1 = nn.BatchNorm2d(inchannel_rate)
        self.norm2 = nn.BatchNorm2d(out_channels)
        self.sigmoid = nn.Sigmoid()

    def forward(self, x):
        b, c, h, w = x.shape
        # B,C,H,W ==> B,H*W,C
        x_permute = x.permute(0, 2, 3, 1).view(b, -1, c)

        # B,H*W,C ==> B,H,W,C
        x_att_permute = self.linear2(self.relu(self.linear1(x_permute))).view(b, h, w, c)

        # B,H,W,C ==> B,C,H,W
        x_channel_att = x_att_permute.permute(0, 3, 1, 2)

        x = x * x_channel_att

        x_spatial_att = self.relu(self.norm1(self.conv1(x)))
        x_spatial_att = self.sigmoid(self.norm2(self.conv2(x_spatial_att)))

        out = x * x_spatial_att

        return out


if __name__ == '__main__':
    img = torch.rand(1, 64, 32, 48)
    b, c, h, w = img.shape
    net = GAM(in_channels=c, out_channels=c)
    output = net(img)
    print(output.shape)
三、逐步手把手添加CA/ECA/GAM注意力
3.1 第一步
在 ultralytics/nn 目录下面,新建一个叫 attention 的文件夹,然后在里面分别新建一个.py 文件,把注意力模块的“核心代码”粘进去。
注意🔸 如果你使用我完整的项目代码,这个 attention 文件夹已经有了、里面的模块也是有的,直接使用进行训练和测试,如果没有你只需要在里面新建一个 py 文件或直接修改已有的即可,如下图所示。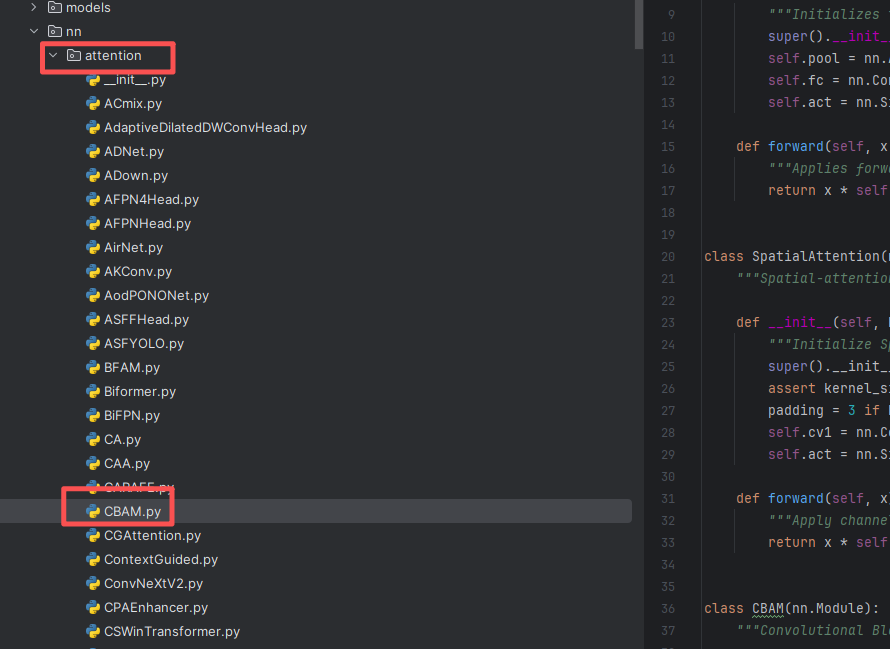
3.2 第二步
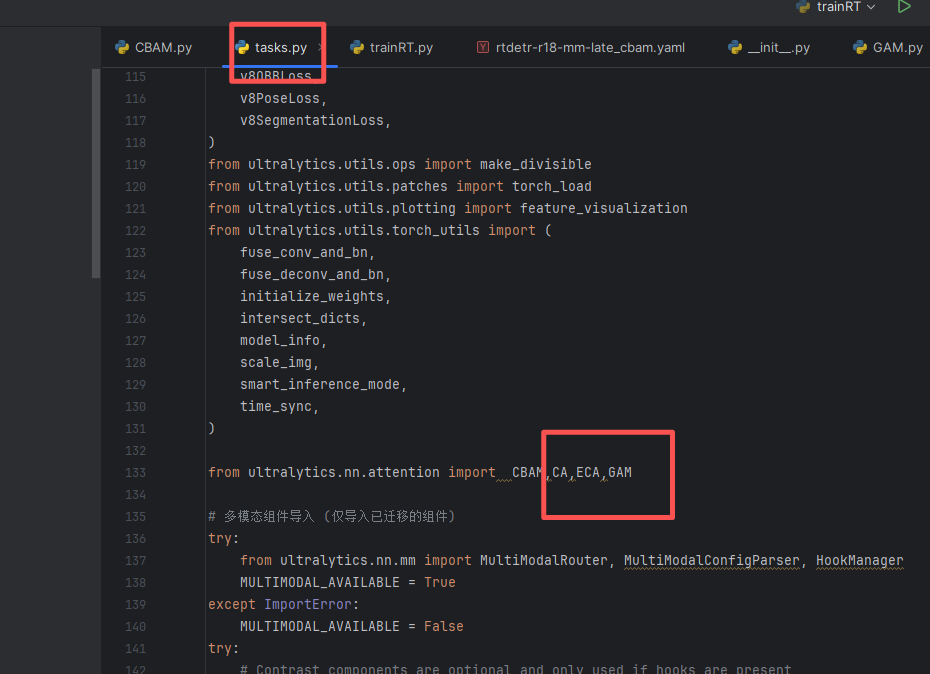
第二步:在该目录下新建一个名为 __init__.py 的 Python 文件(如果使用的是我项目提供的工程,该文件一般已经存在,无需重复创建),然后在该文件中导入我们自定义的注意力CA、ECA和GAM,具体写法如下图所示。

3.3 第三步
第三步:找到 ultralytics/nn/tasks.py 文件,在其中完成我们模块 CA、ECA和GAM 的导入和注册(如果使用的是我提供的项目工程,该文件已自带,无需新建)。具体书写方式如下图所示
3.4 第四步
第四步:找到 ultralytics/nn/tasks.py 文件,在 parse_model 方法中加入对应配置即可,具体书写方式如下图所示。
        elif m in {CBAM,CA,ECA,GAM}:  # 所有注意力机制模块
            c2 = ch[f]
            args = [c2, *args]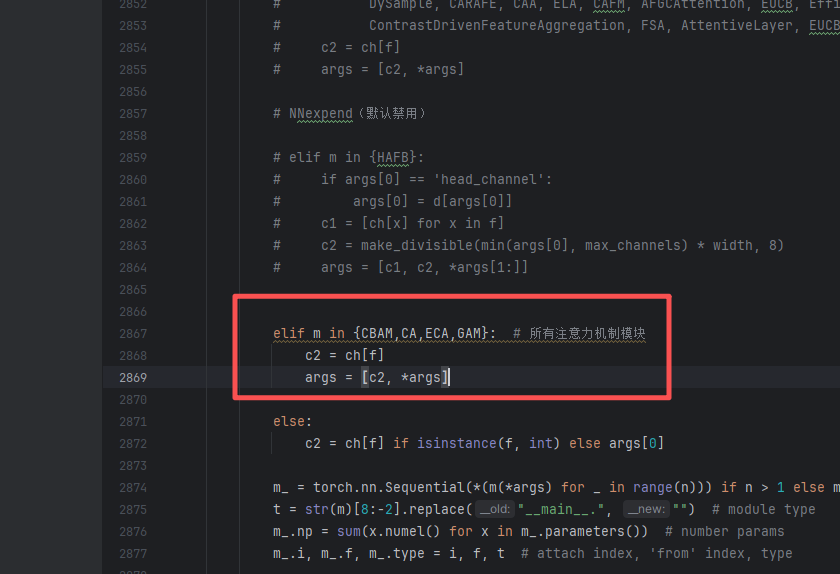
四 完整yaml
4.1 RTDETR-MM前期(early)加入CA、ECA和GAM
ECA训练信息:rtdetr-r18-mm-early_ca_eca_gam summary: 291 layers, 20,084,923 parameters, 20,084,923 gradients, 58.5 GFLOPs
CA训练信息:rtdetr-r18-mm-early_ca_eca_gam summary: 294 layers, 20,085,432 parameters, 20,085,432 gradients, 58.5 GFLOPs
GAM训练信息:rtdetr-r18-mm-early_ca_eca_gam summary: 296 layers, 20,110,680 parameters, 20,110,680 gradients, 63.7 GFLOPs
# Ultralytics YOLO 🚀, AGPL-3.0 license
# RT-DETR-r18 MultiModal Early Fusion model
# Early fusion: RGB+X channels concatenated at input (6 channels)

# Parameters
nc: 80  # number of classes
scales: # model compound scaling constants
  # [depth, width, max_channels]
  l: [1.00, 1.00, 1024]

# Model architecture - Early fusion with 6-channel input
backbone:
  # [from, repeats, module, args]
  - [-1, 1, ConvNormLayer, [32, 3, 2, None, False, 'relu'], 'Dual'] # 0-P1/2 6-channel input

#  - [-1, 1, ECA, []] # 0-P1/2 6-channel input                                   #########   加入注意力 ,同时也可以替换为其他的注意力
#  - [-1, 1, CA, []] # 0-P1/2 6-channel input                                   #########   加入注意力 ,同时也可以替换为其他的注意力
  - [-1, 1, GAM, []] # 0-P1/2 6-channel input                                   #########   加入注意力 ,同时也可以替换为其他的注意力

  - [-1, 1, ConvNormLayer, [32, 3, 1, None, False, 'relu']] # 1
  - [-1, 1, ConvNormLayer, [64, 3, 1, None, False, 'relu']] # 2
  - [-1, 1, nn.MaxPool2d, [3, 2, 1]] # 3-P2/4

  # ResNet18 stages
  - [-1, 1, Blocks, [64, BasicBlock, 2, 2, 'relu']] # 4
  - [-1, 1, Blocks, [128, BasicBlock, 2, 3, 'relu']] # 5-P3/8
  - [-1, 1, Blocks, [256, BasicBlock, 2, 4, 'relu']] # 6-P4/16
  - [-1, 1, Blocks, [512, BasicBlock, 2, 5, 'relu']] # 7-P5/32

head:
  - [-1, 1, Conv, [256, 1, 1, None, 1, 1, False]]  # 8 input_proj.2
  - [-1, 1, AIFI, [1024, 8]] # 9
  - [-1, 1, Conv, [256, 1, 1]]  # 10, Y5, lateral_convs.0

  - [-1, 1, nn.Upsample, [None, 2, 'nearest']] # 11
  - [7, 1, Conv, [256, 1, 1, None, 1, 1, False]]  # 12 input_proj.1
  - [[-2, -1], 1, Concat, [1]] # 13
  - [-1, 3, RepC3, [256, 0.5]]  # 14, fpn_blocks.0
  - [-1, 1, Conv, [256, 1, 1]]   # 15, Y4, lateral_convs.1

  - [-1, 1, nn.Upsample, [None, 2, 'nearest']] # 16
  - [6, 1, Conv, [256, 1, 1, None, 1, 1, False]]  # 17 input_proj.0
  - [[-2, -1], 1, Concat, [1]]  # 18 cat backbone P4
  - [-1, 3, RepC3, [256, 0.5]]    # X3 (19), fpn_blocks.1

  - [-1, 1, Conv, [256, 3, 2]]   # 20, downsample_convs.0
  - [[-1, 16], 1, Concat, [1]]  # 21 cat Y4
  - [-1, 3, RepC3, [256, 0.5]]    # F4 (22), pan_blocks.0

  - [-1, 1, Conv, [256, 3, 2]]   # 23, downsample_convs.1
  - [[-1, 11], 1, Concat, [1]]  # 24 cat Y5
  - [-1, 3, RepC3, [256, 0.5]]    # F5 (25), pan_blocks.1

  - [[20, 23, 26], 1, RTDETRDecoder, [nc, 256, 300, 4, 8, 3]]  # Detect(P3, P4, P5)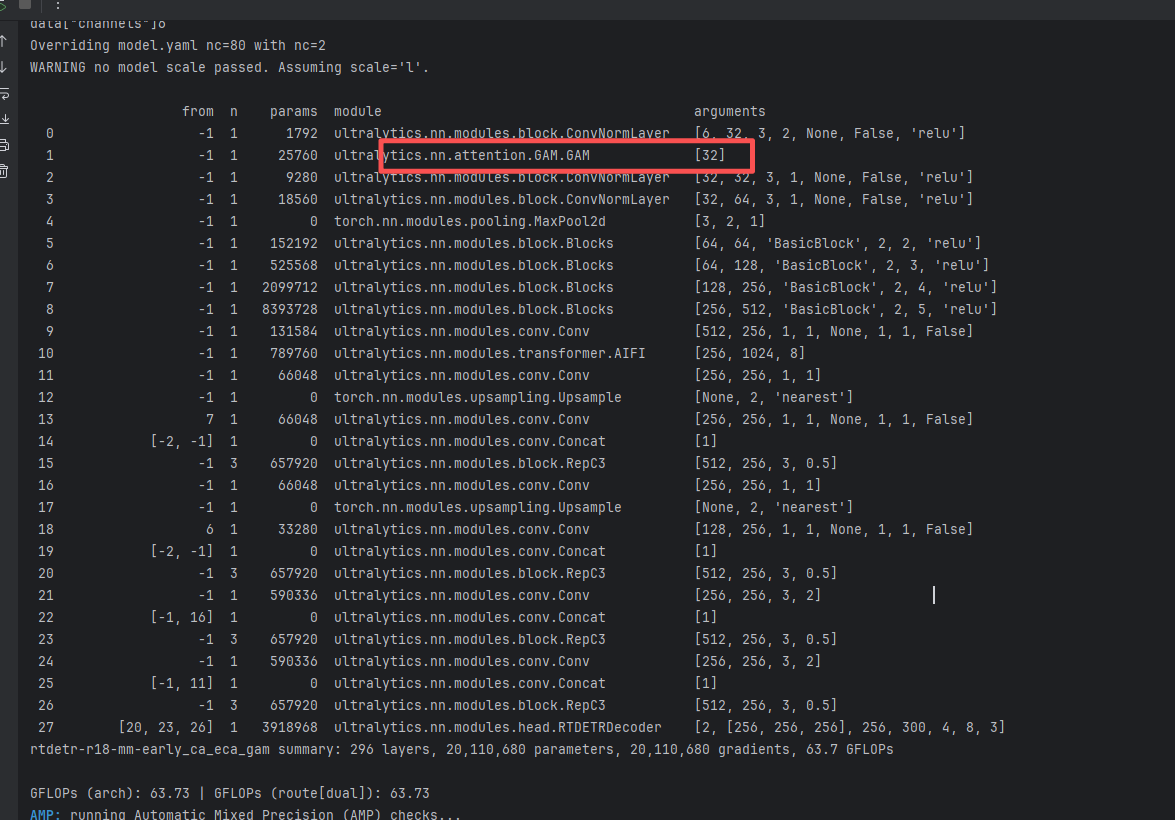
4.2 RTDETR-MM中期(middle)加入CA、ECA和GAM
ECA训练信息:rtdetr-r18-mm-middle_ca_eca_gam summary: 339 layers, 21,217,083 parameters, 21,217,083 gradients, 81.1 GFLOPs
CA训练信息:rtdetr-r18-mm-middle_ca_eca_gam summary: 342 layers, 21,249,848 parameters, 21,249,848 gradients, 81.1 GFLOPs
GAM训练信息:rtdetr-r18-mm-middle_ca_eca_gam summary: 344 layers, 22,856,760 parameters, 22,856,760 gradients, 102.1 GFLOPs
# Ultralytics YOLO 🚀, AGPL-3.0 license
# RT-DETR-r18 MultiModal Mid-level Fusion model
# Mid-level fusion: Separate RGB and X processing paths with feature fusion

# Parameters
nc: 80  # number of classes
scales: # model compound scaling constants
  # [depth, width, max_channels]
  l: [1.00, 1.00, 1024]

# Model architecture
backbone:
  # RGB Branch - Process RGB modality
  - [-1, 1, ConvNormLayer, [32, 3, 2, None, False, 'relu'], 'RGB'] # 0-P1/2 RGB input
  - [-1, 1, ConvNormLayer, [32, 3, 1, None, False, 'relu']] # 1
  - [-1, 1, ConvNormLayer, [64, 3, 1, None, False, 'relu']] # 2
  - [-1, 1, nn.MaxPool2d, [3, 2, 1]] # 3-P2/4

  # X Branch - Process X modality (new input start)
  - [-1, 1, ConvNormLayer, [32, 3, 2, None, False, 'relu'], 'X'] # 4-P1/2 X input (new start)
  - [-1, 1, ConvNormLayer, [32, 3, 1, None, False, 'relu']] # 5
  - [-1, 1, ConvNormLayer, [64, 3, 1, None, False, 'relu']] # 6
  - [-1, 1, nn.MaxPool2d, [3, 2, 1]] # 7-P2/4

  # RGB ResNet18 stages
  - [3, 1, Blocks, [64, BasicBlock, 2, 2, 'relu']] # 8-RGB Stage2
  - [-1, 1, Blocks, [128, BasicBlock, 2, 3, 'relu']] # 9-RGB Stage3 P3/8

  # X ResNet18 stages
  - [7, 1, Blocks, [64, BasicBlock, 2, 2, 'relu']] # 10-X Stage2
  - [-1, 1, Blocks, [128, BasicBlock, 2, 3, 'relu']] # 11-X Stage3 P3/8

  # Mid-level Fusion at P3
  - [[9, 11], 1, Concat, [1]] # 12 - Concat RGB and X features at P3
  - [-1, 1, Conv, [256, 1, 1]] # 13 - Fusion conv to reduce channels
#  - [-1, 1, ECA, []] # 0-P1/2 6-channel input                                   #########   加入注意力 ,同时也可以替换为其他的注意力
  - [-1, 1, CA, []] # 0-P1/2 6-channel input                                   #########   加入注意力 ,同时也可以替换为其他的注意力
#  - [-1, 1, GAM, []] # 0-P1/2 6-channel input                                   #########   加入注意力 ,同时也可以替换为其他的注意力

  # Continue processing fused features
  - [-1, 1, Blocks, [256, BasicBlock, 2, 4, 'relu']] # 14-P4/16
  - [-1, 1, Blocks, [512, BasicBlock, 2, 5, 'relu']] # 15-P5/32

head:
  # Feature projection and processing (similar to standard RT-DETR)
  - [-1, 1, Conv, [256, 1, 1, None, 1, 1, False]]  # 16 input_proj.2
  - [-1, 1, AIFI, [1024, 8]] # 17 - Using AIFI instead of HybridEncoder
  - [-1, 1, Conv, [256, 1, 1]]  # 18, Y5, lateral_convs.0

  - [-1, 1, nn.Upsample, [None, 2, 'nearest']] # 19
  - [15, 1, Conv, [256, 1, 1, None, 1, 1, False]]  # 20 input_proj.1 (from P4)
  - [[-2, -1], 1, Concat, [1]] # 21
  - [-1, 3, RepC3, [256, 0.5]]  # 22, fpn_blocks.0
  - [-1, 1, Conv, [256, 1, 1]]   # 23, Y4, lateral_convs.1

  - [-1, 1, nn.Upsample, [None, 2, 'nearest']] # 24
  - [14, 1, Conv, [256, 1, 1, None, 1, 1, False]]  # 25 input_proj.0 (from fused P3)
  - [[-2, -1], 1, Concat, [1]]  # 26 cat backbone P3
  - [-1, 3, RepC3, [256, 0.5]]    # 27, fpn_blocks.1

  - [-1, 1, Conv, [256, 3, 2]]   # 28, downsample_convs.0
  - [[-1, 24], 1, Concat, [1]]  # 29 cat Y4
  - [-1, 3, RepC3, [256, 0.5]]    # 30, pan_blocks.0

  - [-1, 1, Conv, [256, 3, 2]]   # 31, downsample_convs.1
  - [[-1, 19], 1, Concat, [1]]  # 32 cat Y5
  - [-1, 3, RepC3, [256, 0.5]]    # 33, pan_blocks.1

  - [[28, 31, 34], 1, RTDETRDecoder, [nc, 256, 300, 4, 8, 3]]  # Detect(P3, P4, P5)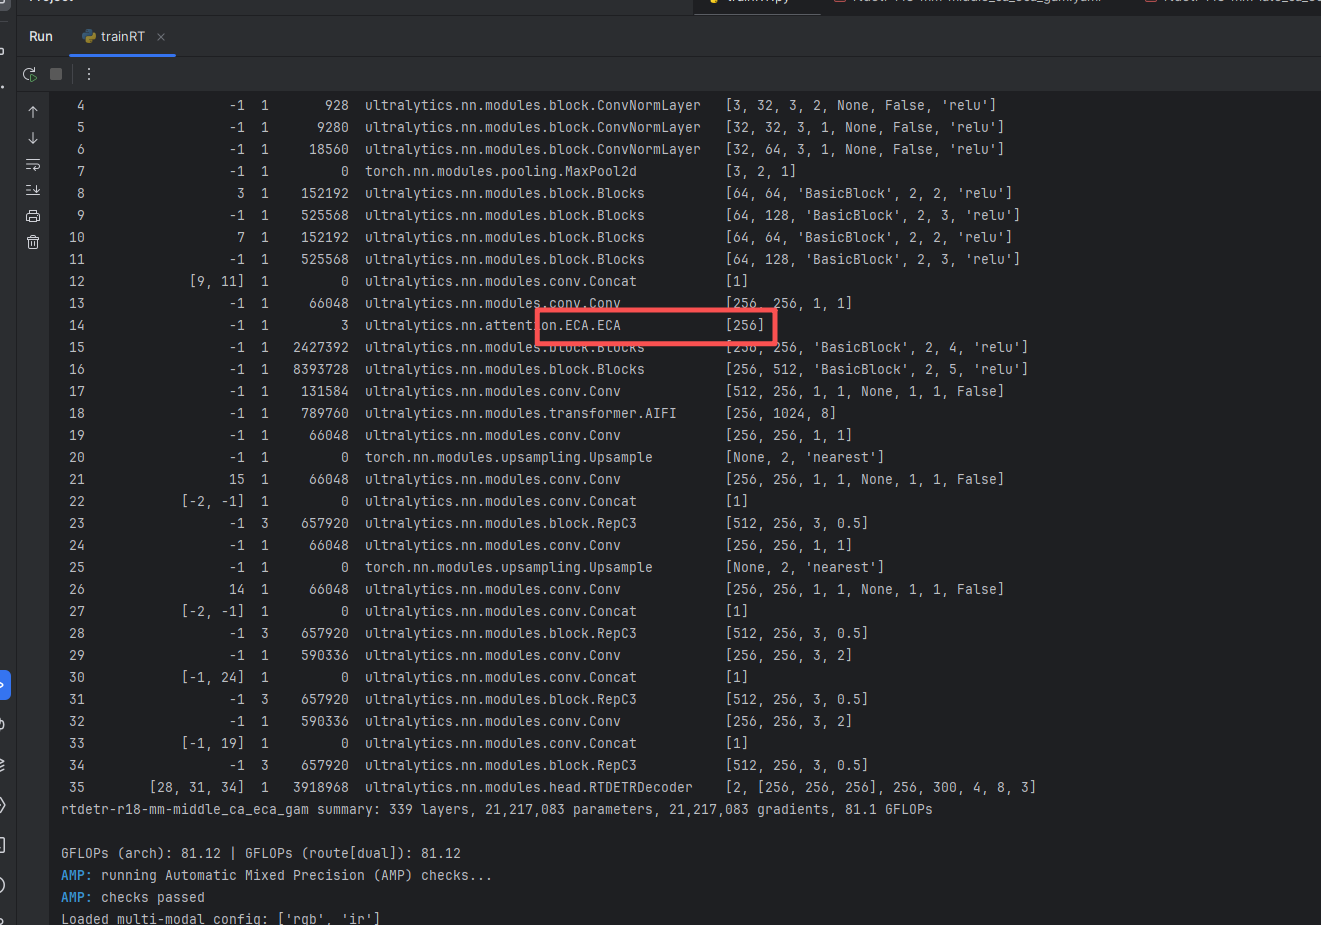
4.3RTDETR-MM中期(late)加入CA、ECA和GAM
ECA训练信息:rtdetr-r18-mm-late_ca_eca_gam summary: 508 layers, 36,445,761 parameters, 36,445,761 gradients, 110.4 GFLOPs
CA训练信息:rtdetr-r18-mm-late_ca_eca_gam summary: 517 layers, 36,838,968 parameters, 36,838,968 gradients, 110.4 GFLOPs
GAM训练信息:rtdetr-r18-mm-late_ca_eca_gam summary: 523 layers, 56,114,232 parameters, 56,114,232 gradients, 220.5 GFLOPs
# Ultralytics YOLO 🚀, AGPL-3.0 license
# RT-DETR-r18 MultiModal Mid-level Fusion model
# Mid-level fusion: Separate RGB and X processing paths with feature fusion

# Parameters
nc: 80  # number of classes
scales: # model compound scaling constants
  # [depth, width, max_channels]
  l: [1.00, 1.00, 1024]

# Model architecture
backbone:
  # RGB Branch - Process RGB modality
  - [-1, 1, ConvNormLayer, [32, 3, 2, None, False, 'relu'], 'RGB'] # 0-P1/2 RGB input
  - [-1, 1, ConvNormLayer, [32, 3, 1, None, False, 'relu']] # 1
  - [-1, 1, ConvNormLayer, [64, 3, 1, None, False, 'relu']] # 2
  - [-1, 1, nn.MaxPool2d, [3, 2, 1]] # 3-P2/4
  - [ -1, 1, Blocks, [ 64, BasicBlock, 2, 2, 'relu' ] ] # 4
  - [ -1, 1, Blocks, [ 128, BasicBlock, 2, 3, 'relu' ] ] # 5-P3/8
  - [ -1, 1, Blocks, [ 256, BasicBlock, 2, 4, 'relu' ] ] # 6-P4/16
  - [ -1, 1, Blocks, [ 512, BasicBlock, 2, 5, 'relu' ] ] # 7-P5/32

  # X Branch - Process X modality (new input start)
  - [-1, 1, ConvNormLayer, [32, 3, 2, None, False, 'relu'], 'X'] # 4-P1/2 X input (new start)
  - [-1, 1, ConvNormLayer, [32, 3, 1, None, False, 'relu']] # 5
  - [-1, 1, ConvNormLayer, [64, 3, 1, None, False, 'relu']] # 6
  - [-1, 1, nn.MaxPool2d, [3, 2, 1]] # 7-P2/4
  - [ -1, 1, Blocks, [ 64, BasicBlock, 2, 2, 'relu' ] ] # 12
  - [ -1, 1, Blocks, [ 128, BasicBlock, 2, 3, 'relu' ] ] # 13-P3/8
  - [ -1, 1, Blocks, [ 256, BasicBlock, 2, 4, 'relu' ] ] # 14-P4/16
  - [ -1, 1, Blocks, [ 512, BasicBlock, 2, 5, 'relu' ] ] # 15-P5/32

head:
  # RGB检测分支
  - [7, 1, Conv, [256, 1, 1, None, 1, 1, False]]  # 16 input_proj.2
  - [-1, 1, AIFI, [1024, 8]] # 17 - Using AIFI instead of HybridEncoder
  - [-1, 1, Conv, [256, 1, 1]]  # 18, Y5, lateral_convs.0

  - [-1, 1, nn.Upsample, [None, 2, 'nearest']] # 19
  - [6, 1, Conv, [256, 1, 1, None, 1, 1, False]]  # 20 input_proj.1 (from P4)
  - [[-2, -1], 1, Concat, [1]] # 21
  - [-1, 3, RepC3, [256, 0.5]]  # 22, fpn_blocks.0
  - [-1, 1, Conv, [256, 1, 1]]   # 23, Y4, lateral_convs.1

  - [-1, 1, nn.Upsample, [None, 2, 'nearest']] # 24
  - [5, 1, Conv, [256, 1, 1, None, 1, 1, False]]  # 25 input_proj.0 (from fused P3)
  - [[-2, -1], 1, Concat, [1]]  # 26 cat backbone P3
  - [-1, 3, RepC3, [256, 0.5]]    # 27, fpn_blocks.1

  - [-1, 1, Conv, [256, 3, 2]]   # 28, downsample_convs.0
  - [[-1, 23], 1, Concat, [1]]  # 29 cat Y4
  - [-1, 3, RepC3, [256, 0.5]]    # 30, pan_blocks.0

  - [-1, 1, Conv, [256, 3, 2]]   # 31, downsample_convs.1
  - [[-1, 18], 1, Concat, [1]]  # 32 cat Y5
  - [-1, 3, RepC3, [256, 0.5]]    # 33, pan_blocks.1

  # IR检测分支
  - [15, 1, Conv, [256, 1, 1, None, 1, 1, False]]  # 34 input_proj.2
  - [-1, 1, AIFI, [1024, 8]] # 35 - Using AIFI instead of HybridEncoder
  - [-1, 1, Conv, [256, 1, 1]]  # 36, Y5, lateral_convs.0

  - [-1, 1, nn.Upsample, [None, 2, 'nearest']] # 37
  - [14, 1, Conv, [256, 1, 1, None, 1, 1, False]]  # 38 input_proj.1 (from P4)
  - [[-2, -1], 1, Concat, [1]] # 39
  - [-1, 3, RepC3, [256, 0.5]]  # 40, fpn_blocks.0
  - [-1, 1, Conv, [256, 1, 1]]   # 41, Y4, lateral_convs.1

  - [-1, 1, nn.Upsample, [None, 2, 'nearest']] # 42
  - [13, 1, Conv, [256, 1, 1, None, 1, 1, False]]  # 43 input_proj.0 (from fused P3)
  - [[-2, -1], 1, Concat, [1]]  # 44 cat backbone P3
  - [-1, 3, RepC3, [256, 0.5]]    # 45, fpn_blocks.1

  - [-1, 1, Conv, [256, 3, 2]]   # 46, downsample_convs.0
  - [[-1, 41], 1, Concat, [1]]  # 47 cat Y4
  - [-1, 3, RepC3, [256, 0.5]]    # 48, pan_blocks.0

  - [-1, 1, Conv, [256, 3, 2]]   # 49, downsample_convs.1
  - [[-1, 36], 1, Concat, [1]]  # 50 cat Y5
  - [-1, 3, RepC3, [256, 0.5]]    # 51, pan_blocks.1

  - [[27, 45], 1, Concat, [1]]                   # 51 融合P3
#  - [-1, 1, ECA, []] # 0-P1/2 6-channel input                                   #########   加入注意力 ,同时也可以替换为其他的注意力
#  - [-1, 1, CA, []] # 0-P1/2 6-channel input                                   #########   加入注意力 ,同时也可以替换为其他的注意力
  - [-1, 1, GAM, []] # 0-P1/2 6-channel input                                   #########   加入注意力 ,同时也可以替换为其他的注意力

  - [[30, 48], 1, Concat, [1]]                   # 53 融合P4
#  - [-1, 1, ECA, []] # 0-P1/2 6-channel input                                   #########   加入注意力 ,同时也可以替换为其他的注意力
#  - [-1, 1, CA, []] # 0-P1/2 6-channel input                                   #########   加入注意力 ,同时也可以替换为其他的注意力
  - [-1, 1, GAM, []] # 0-P1/2 6-channel input                                   #########   加入注意力 ,同时也可以替换为其他的注意力

  - [[33, 51], 1, Concat, [1]]                   # 55 融合P5
#  - [-1, 1, ECA, []] # 0-P1/2 6-channel input                                   #########   加入注意力 ,同时也可以替换为其他的注意力
#  - [-1, 1, CA, []] # 0-P1/2 6-channel input                                   #########   加入注意力 ,同时也可以替换为其他的注意力
  - [-1, 1, GAM, []] # 0-P1/2 6-channel input                                   #########   加入注意力 ,同时也可以替换为其他的注意力

  - [[52, 54, 56], 1, RTDETRDecoder, [nc, 256, 300, 4, 8, 3]]  # Detect(P3, P4, P5)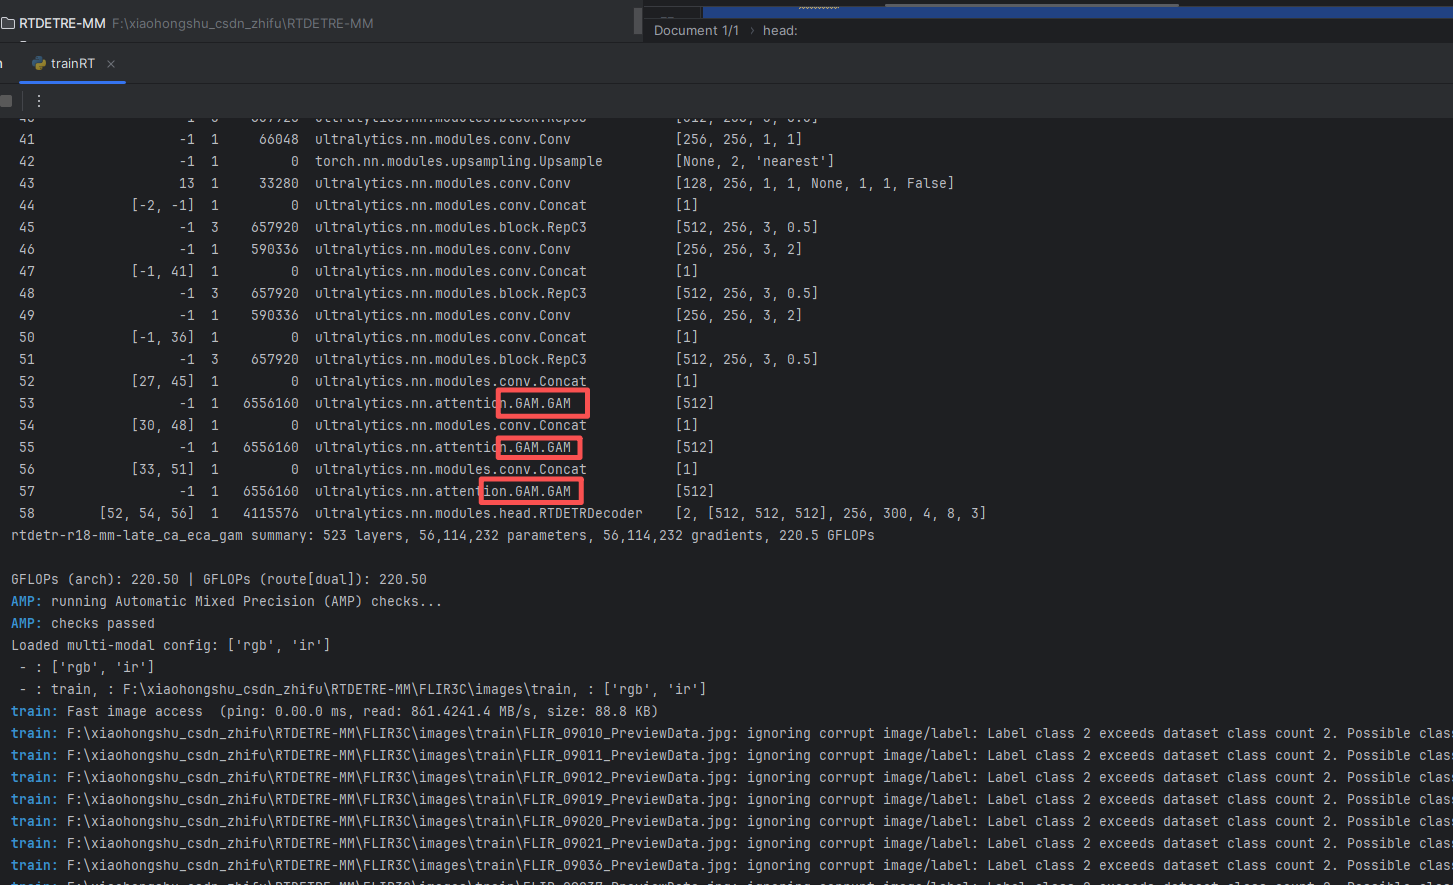
五 训练代码和结果
5.1 模型训练代码
import warnings
from ultralytics import RTDETRMM

# 1. 可选:屏蔽 timm 的未来弃用警告(不影响训练,仅减少控制台噪音)
warnings.filterwarnings(
    "ignore",
    category=FutureWarning,
    message="Importing from timm.models.layers is deprecated, please import via timm.layers"
)

if __name__ == "__main__":
    model = RTDETRMM("ultralytics/cfg/models/attention/rtdetr-r18-mm-late_ca_eca_gam.yaml")

    model.train(
        data="FLIR3C/data.yaml",   # 多模态数据集配置(上一节已经编写)
        epochs=10,                 # 训练轮数,实际实验中建议 100+ 起步
        batch=2,                   # batch size,可根据显存大小调整
        imgsz=640,                 # 输入分辨率(默认 640),可与数据集分辨率统一
        device=0,                  # 指定 GPU id,CPU 训练可写 "cpu"
        workers=2,                 # dataloader 线程数(Windows 一般 0~4 比较稳)
        project="runs/mm_exp",     # 训练结果保存根目录
        name="rtdetrmm_flir3c",    # 当前实验名,对应子目录名
        # resume=True,             # 如需从中断的训练继续,可打开此项
        # patience=30,             # 早停策略,连降若干轮 mAP 不提升则停止
        # modality="X",            # 模态消融参数(默认由 data.yaml 中的 modality_used 决定)
        # cache=True,              # 启用图片缓存,加快 IO(内存足够时可打开)
    )
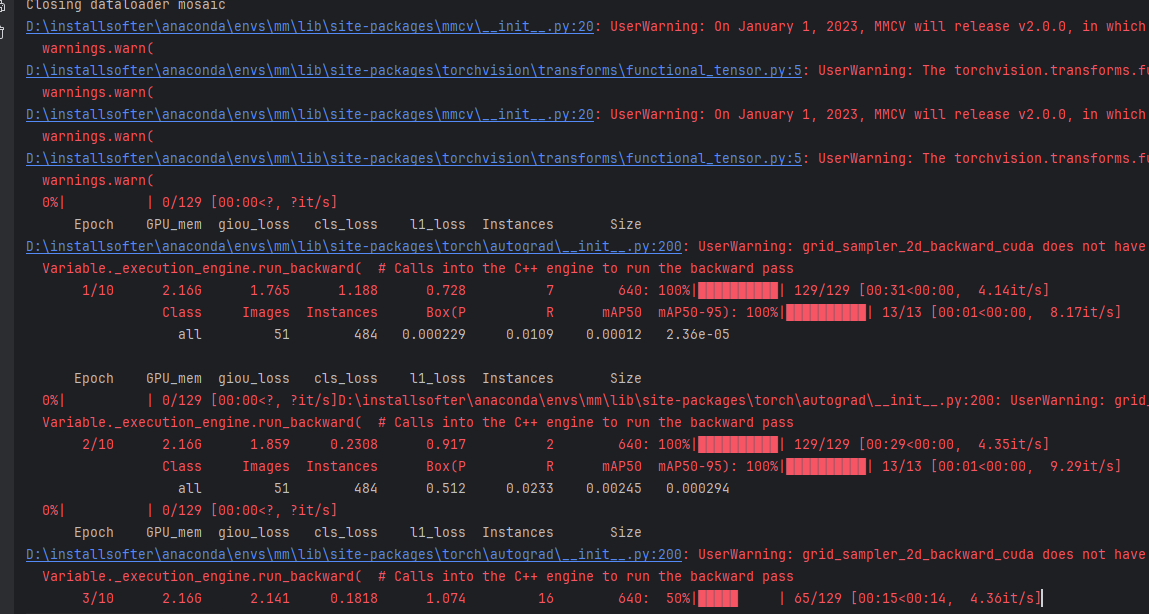
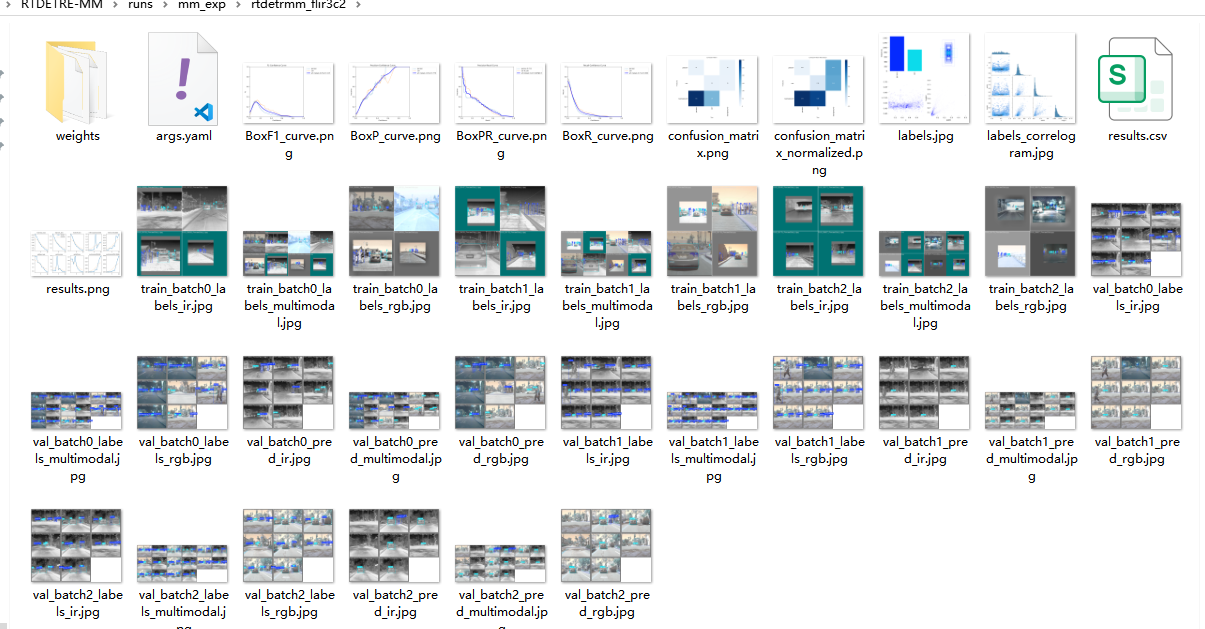
5.2 模型训练结果
六 总结
到这里,本文的正式内容就告一段落啦。
最后也想郑重向大家推荐我的专栏 「RTDETR-MM 多模态目标检测」。目前专栏整体以实战为主,每一篇都是我亲自上手验证后的经验沉淀。后续我也会持续跟进最新顶会的前沿工作进行论文复现,并对一些经典方法及改进机制做系统梳理和补充。
✨如果这篇文章对你哪怕只有一丝帮助,欢迎订阅本专栏、关注我,并私信联系,我会拉你进入 「RTDETR-MM 多模态目标检测」技术交流群 QQ 群~
你的支持,就是我持续输出的最大动力!✨
更多推荐


 17
17 0
0- 0


 已为社区贡献3条内容

所有评论(0)