
深度学习之优化模型(迁移学习)和最优模型的保存
这里我们需要注意的就是前面我们保存最优模型时用的是全连接而不是cnn这里我们也要保持一致,由于这里都是函数需要调用所以我们只需要改动主函数中的使用就行了,如果我们使用的是cnn那么这里就要调用的是cnn函数,前后是要保持一致的。此外model写在了优化器后面,调度器前面,这里我们使用的调度器是StepLR,比较方便。我们在训练循环最后加上这两行就是保存训练结束后最后一个模型,可以在后续预测的时候调
·
一、迁移学习
和上一篇一样的结构,把cnn换为全连接
此外model写在了优化器后面,调度器前面,这里我们使用的调度器是StepLR,比较方便。
class USE_getitem():
def __init__(self,text):
self.text=text
def __getitem__(self, index):
result=self.text[index].upper()
return result
def __len__(self):
return len(self.text)
p= USE_getitem("pytorch")
print(p[0],p[1])
print(len(p))
import torch
from torch.utils.data import Dataset,DataLoader
import numpy as np
from PIL import Image
from torchvision import transforms
import torch.nn as nn
'''数据预处理'''
data_transforms={
'train':
transforms.Compose([#数据增强
transforms.Resize([280,280]),#先把图片缩放到280x280
transforms.RandomCrop(256),#随机裁剪到256x256
transforms.RandomHorizontalFlip(p=0.5),#50%概率水平翻转
transforms.ColorJitter(brightness=0.1,contrast=0.1),#调整亮度#,saturation=0.1,hue=0.1
transforms.ToTensor(),#转成张量
]),
'valid':
transforms.Compose([
transforms.Resize([256,256]),#测试时就直接缩放到256x256
transforms.ToTensor(),#转成张量
]),
}
class food_dataset(Dataset):
def __init__(self,file_path,transform=None):
self.file_path=file_path
self.imgs=[]
self.labels=[]
self.transform=transform
with open(self.file_path) as f :
samples=[x.strip().split() for x in f.readlines()]
for img_path,label in samples:
self.imgs.append(img_path)
self.labels.append(label)
def __len__(self):
return len(self.imgs)
def __getitem__(self, idx):
image=Image.open(self.imgs[idx])
if self.transform:
image=self.transform(image)
label=self.labels[idx]
label=int(label)
label=torch.from_numpy(np.array(label,dtype=np.int64))
return image,label
training_data=food_dataset(file_path=r'.\train.txt',transform=data_transforms['train'])
test_data=food_dataset(file_path=r'.\test.txt',transform=data_transforms['valid'])
train_dataloader=DataLoader(training_data, batch_size=64,shuffle=True)
test_dataloader=DataLoader(test_data, batch_size=64,shuffle=True)
'''下面为修改的区域'''
import torchvision.models as models
from torchvision.models import ResNet18_Weights
#加载预训练模型
resnet_model=models.resnet18(weights=ResNet18_Weights.DEFAULT)
#冻结所有参数(只训练最后一层)
for param in resnet_model.parameters():
param.requires_grad=False
#修改最后一层(适应二十类食物)
in_features=resnet_model.fc.in_features#获取原输出维度
resnet_model.fc=nn.Linear(in_features,20)#20类
##只训练最后一层参数
params_to_update=[]
for param in resnet_model.parameters():
if param.requires_grad:#只收集需要训练的参数
params_to_update.append(param)#这种写法是收集所有需要训练的参数
device = "cuda" if torch.cuda.is_available() else "mps" if torch.backends.mps.is_available() else 'cpu'
def train(dataloader,model,loss_fn,optimizer):
model.train()
batch_size_num=1#统计训练的batch数量
for X,y in dataloader:#其中batch为每一个数据的编号
X,y = X.to(device),y.to(device) # 把训练数据集和标签传入cpu或GPU
pred = model.forward(X)#.forward可以被省略,父类中已经对此功能进行了设置,
loss = loss_fn(pred,y)
optimizer.zero_grad()
loss.backward()
optimizer.step()
loss_value = loss.item()
# if batch_size_num %10==0:#这里数据比较少所以不用除以10
print(f"loss:{loss_value:>7f} [number:{batch_size_num}]")
batch_size_num +=1
def test (dataloader,model,loss_fn):
size=len(dataloader.dataset)
num_batchs=len(dataloader)
model.eval()
test_loss, correct = 0,0
with torch.no_grad():
for X,y in dataloader:
X,y = X.to(device),y.to(device)
pred = model.forward(X)
test_loss += loss_fn(pred,y).item() # test_loss是会自动累加每一个批次的损失值
correct +=(pred.argmax(1)== y).type(torch.float).sum().item() # 标量
a=(pred.argmax(1)== y)
b=(pred.argmax(1)== y).type(torch.float)
test_loss /= num_batchs
correct /= size
accuracy = 100*correct
print(f"Test result: \n Accuracy :{(accuracy)}%,Avg loss:{test_loss}")
return accuracy
loss_fn=nn.CrossEntropyLoss()
optimizer = torch.optim.Adam(params_to_update, lr=0.001)#优化器
model = resnet_model.to(device)#把model写在这里
scheduler=torch.optim.lr_scheduler.StepLR(optimizer,step_size=10,gamma=0.5)#调度器
best_acc = 0
epochs=50
for t in range(epochs):
print(f"Epoch{t+1}\n------")
train(train_dataloader,model,loss_fn,optimizer)
current_acc=test(test_dataloader, model, loss_fn)
scheduler.step()
current_lr=optimizer.param_groups[0]['lr']
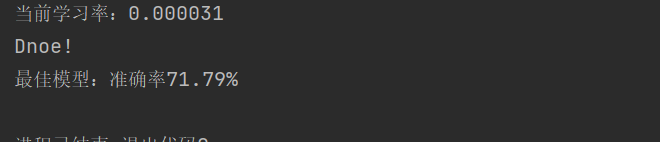
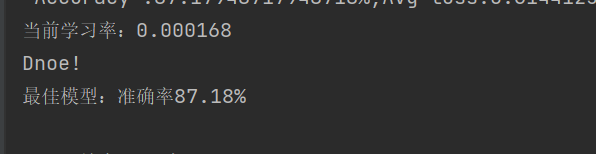
print(f'当前学习率:{current_lr:.6f}')
if current_acc > best_acc:
best_acc = current_acc
torch.save(model.state_dict(),'best_model.pth')
print(f'最佳模型:准确率{best_acc:.2f}%')
print("Dnoe!")
print(f'最佳模型:准确率{best_acc:.2f}%')
准确率升高了很多
二、增加网络层
1.把上述代码中resnet_model.fc=nn.Linear(in_features,20)改为:
resnet_model.fc=nn.Sequential(
    nn.Linear(in_features,512),#第一层:512个神经元
    nn.BatchNorm1d(512),#批量归一化,可以加速训练
    nn.ReLU(),#激活函数
    nn.Dropout(0.5),#dropout防止过拟合,0.5的丢弃率

    nn.Linear(512,256),#第二层:256个神经元
    nn.BatchNorm1d(256),
    nn.ReLU(),
    nn.Dropout(0.3),

    nn.Linear(256,20)#最终输出层:20类
)
2.把后面只训练最后一层函数的代码改成下面这样:
 params_to_update = []
 for param in resnet_model.fc.parameters():  # 明确指定fc层
     param.requires_grad = True  # 确保它可训练
     params_to_update.append(param)#多层网络的时候只收集fc层的参数
3.优化器改为下面这样:
optimizer = torch.optim.Adam(params_to_update, lr=0.001,weight_decay=1e-4)#多层网络结构添加L2正则化4.调度器改为下面这样:
scheduler=torch.optim.lr_scheduler.StepLR(optimizer,step_size=10,gamma=0.7)#多层下可以增加频率最后结果,又提升了一些正确率
三、最优模型的保存和调用
1.保存
我们在训练循环最后加上这两行就是保存训练结束后最后一个模型,可以在后续预测的时候调用
torch.save(model.state_dict(), 'food_model.pth')
print("模型已保存为 food_model.pth")
一般最后一个不一定是最优的那个模型,所以我们可以用
best_acc = 0
和
torch.save(model.state_dict(),'best_model.pth')
print(f'最佳模型:准确率{best_acc:.2f}%')
上述代码中已经使用了,文件列表就会有这个文件

2.调用
这里我们需要注意的就是前面我们保存最优模型时用的是全连接而不是cnn这里我们也要保持一致,由于这里都是函数需要调用所以我们只需要改动主函数中的使用就行了,如果我们使用的是cnn那么这里就要调用的是cnn函数,前后是要保持一致的
import io
import torch
from torchvision import transforms
from PIL import Image
import torch.nn.functional as F
import sys
import os
import torch.nn as nn
'''cnn'''
class CNN(torch.nn.Module):
def __init__(self, num_classes=20):
super(CNN, self).__init__()
self.conv1 = torch.nn.Sequential(
torch.nn.Conv2d(in_channels=3, out_channels=16, kernel_size=5, stride=1, padding=2),
torch.nn.ReLU(),
torch.nn.MaxPool2d(kernel_size=2),
)
self.conv2 = torch.nn.Sequential(
torch.nn.Conv2d(16, 32, 5, 1, 2),
torch.nn.ReLU(),
torch.nn.Conv2d(32, 32, 5, 1, 2),
torch.nn.ReLU(),
torch.nn.MaxPool2d(2),
)
self.conv3 = torch.nn.Sequential(
torch.nn.Conv2d(32, 128, 5, 1, 2),
torch.nn.ReLU(),
# 注意:没有最后的MaxPool!
)
# 关键!输入尺寸:128 * 64 * 64
self.dropout = nn.Dropout(0.3)
self.out = torch.nn.Linear(128 * 64 * 64, 20)
def forward(self, x):
x = self.conv1(x)
x = self.conv2(x)
x = self.conv3(x)
x = x.view(x.size(0), -1) # 展平
output = self.out(x)
return output
'''全连接'''
sys.stdout=io.TextIOWrapper(sys.stdout.buffer,encoding='utf-8')
def resnet18_model(model_path, device='cpu'):
# 初始化模型(结构和训练时完全一致)
# model = CNN(num_classes=20).to(device)
import torchvision.models as models
import torch.nn as nn
resnet_model=models.resnet18(weights=None)
# 加载权重
# checkpoint = torch.load(model_path, map_location=device)
# print('文件里面有哪些键',checkpoint.keys())
# model.load_state_dict(checkpoint) # 如果是用state_dict保存的
in_features=resnet_model.fc.in_features
resnet_model.fc=nn.Sequential(
nn.Linear(in_features,512),#第一层:512个神经元
nn.BatchNorm1d(512),#批量归一化,可以加速训练
nn.ReLU(),#激活函数
nn.Dropout(0.5),#dropout防止过拟合,0.5的丢弃率
nn.Linear(512,256),#第二层:256个神经元
nn.BatchNorm1d(256),
nn.ReLU(),
nn.Dropout(0.3),
nn.Linear(256,20)#最终输出层:20类
)
model=resnet_model.to(device)
checkpoint=torch.load(model_path,map_location=device)
model.load_state_dict(checkpoint)
#评估模式
model.eval()
print(f" 模型加载成功: {model_path}")
return model
'''图像预处理函数'''
def preprocess_image(image_path):
"""处理单张图片,和训练时transform保持一致"""
# 这里的transform必须和训练时一模一样
# transform = transforms.Compose([
# transforms.Resize((256, 256)), # 训练时是256x256
# transforms.ToTensor(),
# # 如果训练时用了Normalize,这里也要加上同样的参数!
# # transforms.Normalize(mean=[0.485, 0.456, 0.406], std=[0.229, 0.224, 0.225]),
# ])
transform = transforms.Compose([
transforms.Resize([256, 256]),
transforms.ToTensor(),
])
# 打开图片并转换
image = Image.open(image_path).convert('RGB') # 确保是RGB
image = transform(image)
image = image.unsqueeze(0) # 增加batch维度: (1, 3, 256, 256)
return image
'''预测函数'''
def predict(model, image_tensor, device, class_names):
"""执行预测"""
image_tensor = image_tensor.to(device)
with torch.no_grad(): # 不计算梯度,加速
outputs = model(image_tensor)
probabilities = F.softmax(outputs, dim=1) # 转概率
confidence, predicted_idx = torch.max(probabilities, 1)
# 结果
predicted_idx = predicted_idx.item()
confidence = confidence.item()
if predicted_idx < len(class_names):
class_name = class_names[predicted_idx]
else:
class_name = f"未知类别({predicted_idx})"
return class_name, confidence, predicted_idx
def class_order(txt_path):
classes={}
with open(txt_path,'r',encoding='gbk')as f:
for line in f:
line=line.strip()
path,label=line.strip().split()
classes[int(label)]=path.split('\\')[-2]
return [classes[i] for i in sorted(classes.keys())]
'''主函数,上面都是函数,需要我们调用'''
def main():
# 设置你的模型路径和图片路径
MODEL_PATH = r"D:\learn\best_model.pth" # 训练保存的模型文件
IMAGE_PATH = r"D:\filedata\food_dataset\train\青菜\img_菠菜_5.jpeg" # 要预测的图片
#类别收集,这里不是原food_dataset文件中类别的顺序,而是我们产生的train.txt和test.txt文件中类别的顺序!!
CLASS_NAMES = class_order(r'.\train.txt')#这里我们收集train.txt文件里面的类别
# 检查文件是否存在
if not os.path.exists(MODEL_PATH):
print(f" 错误:找不到模型文件 {MODEL_PATH}")
print("请先训练模型并用 torch.save() 保存")
return
if not os.path.exists(IMAGE_PATH):
print(f"错误:找不到图片 {IMAGE_PATH}")
return
# 选择设备
device = torch.device('cuda' if torch.cuda.is_available() else 'cpu')
print(f"使用设备: {device}")
# 加载模型
model = resnet18_model(MODEL_PATH, device)#全连接
# 预处理图片
print(f"处理图片: {IMAGE_PATH}")
image_tensor = preprocess_image(IMAGE_PATH)
# 执行预测
class_name, confidence, class_idx = predict(model, image_tensor, device, CLASS_NAMES)
# 打印结果
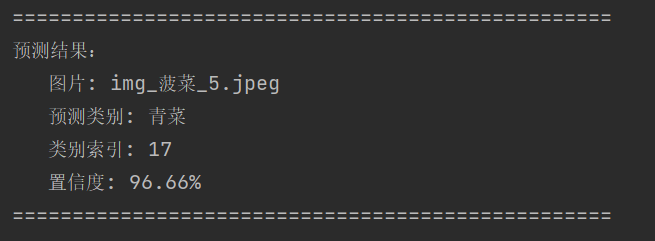
print("\n" + "=" * 50)
print("预测结果:")
print(f" 图片: {os.path.basename(IMAGE_PATH)}")
print(f" 预测类别: {class_name}")
print(f" 类别索引: {class_idx}")
print(f" 置信度: {confidence:.2%}") # 百分比显示
print("=" * 50)
#运行
if __name__ == "__main__":
main()预测结果是正确的
更多推荐


 14
14 0
0- 0


 已为社区贡献1条内容

所有评论(0)