
【深度学习】【完整版】labview调用ONNX模型缺陷检测
本文介绍了LabVIEW与Python结合实现目标检测的方法。文章详细说明了ONNX模型检测的实现流程,包括图像预处理、模型推理、后处理等步骤,并提供了完整的Python代码实现。该方法通过LabVIEW调用Python脚本,结合OpenCV和ONNXRuntime实现了高效的目标检测功能,最终能够输出检测结果并在原图上绘制检测框
·
在之前的文章基础上增加了部分功能
原文链接:https://blog.csdn.net/weixin_44464662/article/details/153695025
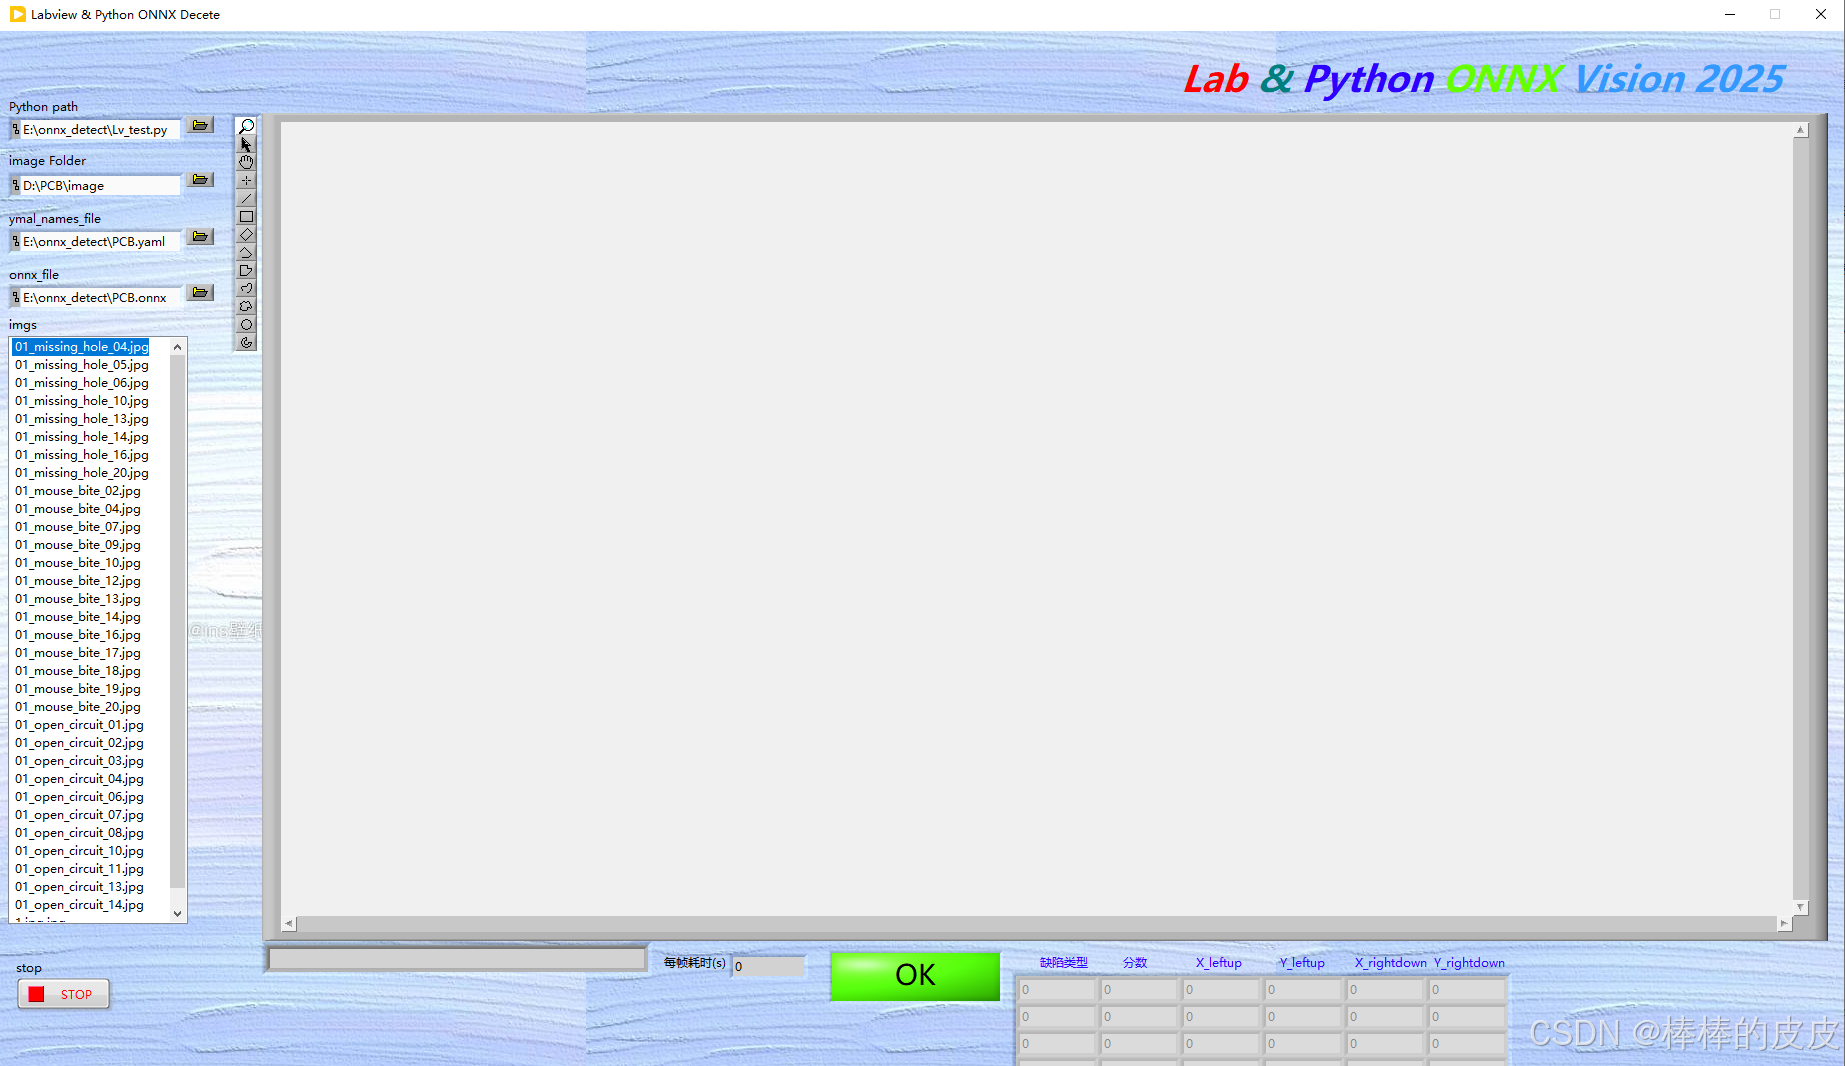
界面如下图:
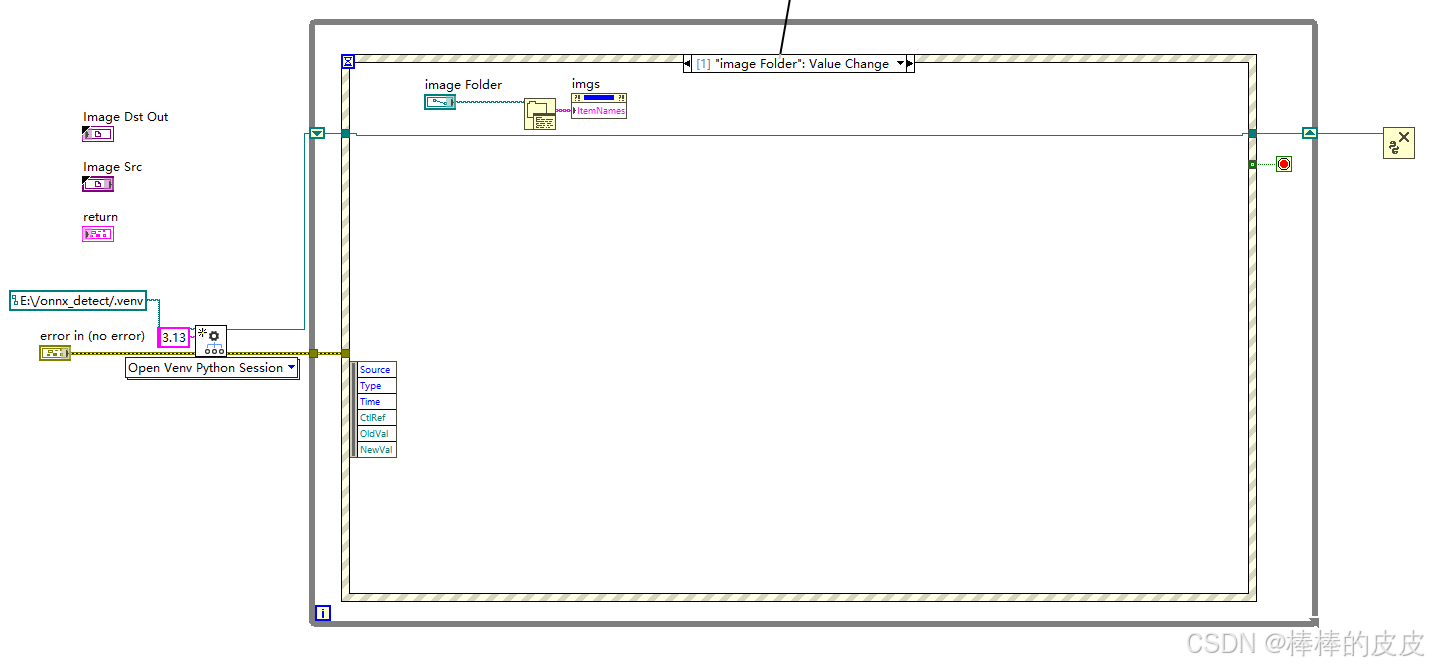
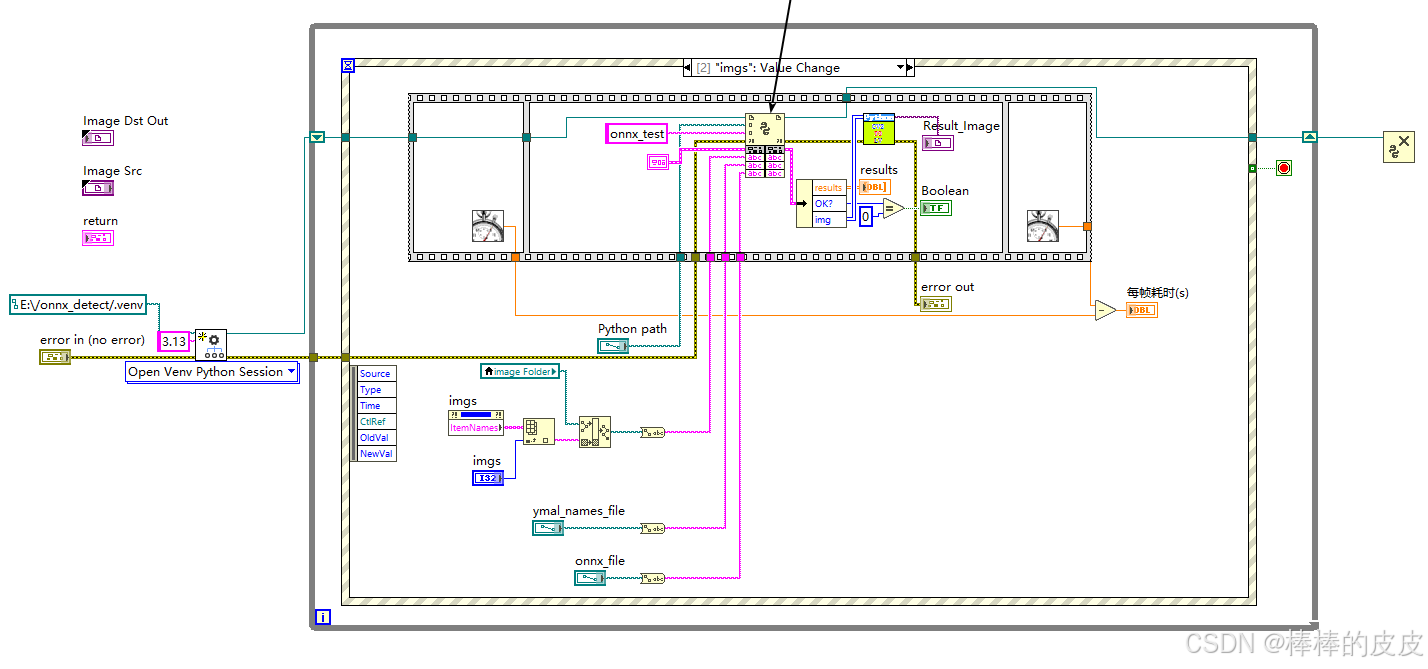
后面板:
注意点:
在LV内调用Python代码内CV2图片数组转为LV数组时报错,修改C:\Program Files\National Instruments\Shared\NIPythonInterface\NumpyMarshallModule.py
修改内容为:(作用为确保数组是C风格连续的)
def NumpyToCPtr(numpyArr):
	     cArrPtr = np.ctypeslib.as_ctypes(numpyArr)
	     cArr = ctypes.cast(cArrPtr, ctypes.c_void_p)
	     return (cArr.value, numpyArr.shape)
改为:
def NumpyToCPtr(numpyArr):
	     cArrPtr = np.ctypeslib.as_ctypes(np.ascontiguousarray(numpyArr))# 确保它是C风格连续的
	     cArr = ctypes.cast(cArrPtr, ctypes.c_void_p)
	     return (cArr.value, numpyArr.shape)
Python代码:
import cv2
import yaml
import onnxruntime as rt
import numpy as np

def onnx_test(image_path, ymal_path, onnx_path):
    """测试一下labview调用ONNX模型检测"""
    # 加载配置文件
    config_file = ymal_path
    with open(config_file, "r") as config:
        config = yaml.safe_load(config)
    dic = config["names"]  # 得到的是模型类别字典
    class_list = list(dic.values())

    img = cv2.imread(image_path)
    # 前处理
    img_after = resize_image(img, (640, 640), True)  # (640, 640, 3)
    # 将图像处理成输入的格式
    data = img2input(img_after)
    # 输入模型
    sess = rt.InferenceSession(onnx_path)  # yolov11模型onnx格式
    input_name = sess.get_inputs()[0].name
    label_name = sess.get_outputs()[0].name
    pred = sess.run([label_name], {input_name: data})[0]  # 输出(8400x7, 84=3cls+4reg, 8400=3种尺度的特征图叠加)
    pred = std_output(pred)
    # 置信度过滤+nms
    results = nms(pred, 0.5, 0.4)  # [x,y,w,h,conf(最大类别概率),class]
    # 坐标变换
    result_bool = 0
    results_list = []
    image= []
    if results:
        results = cod_trf(results, img, img_after)

        image = draw(results, img, class_list)
        # image = np.ascontiguousarray(image)  # 确保它是C风格连续的
        # 使用transpose来改变数组的形状
        image = np.transpose(image, (2, 0, 1))
        print("image======", image.shape)
        # 使用swapaxes来改变数组的形状
        # image = np.swapaxes(image, 0, 2)
        i = 0
        for result in range(len(results)):
            results_list.append(
                [results[i][5], np.round(results[i][4], 2), np.round(results[i][0], 2), np.round(results[i][1], 2),
                 np.round(results[i][2], 2), np.round(results[i][3], 2)])
            i = i + 1
            result_bool = 0
    else:
        result_bool = 1
        image = img
        # 使用transpose来改变数组的形状
        image = np.transpose(image, (2, 0, 1))

    return results_list, result_bool, image

def resize_image(image, size, letterbox_image):
    """
            对输入图像进行resize
        Args:
            size:目标尺寸
            letterbox_image: bool 是否进行letterbox变换
        Returns:指定尺寸的图像
    """
    ih, iw, _ = image.shape # 获取图像高度和宽度,如1280*640
    print(ih, iw)
    h, w = size
    # letterbox_image = False
    if letterbox_image:
        scale = min(w / iw, h / ih)
        nw = int(iw * scale)
        nh = int(ih * scale)
        image = cv2.resize(image, (nw, nh), interpolation=cv2.INTER_LINEAR)
        # 生成画布
        image_back = np.ones((h, w, 3), dtype=np.uint8) * 128
        # 将image放在画布中心区域-letterbox
        image_back[(h - nh) // 2: (h - nh) // 2 + nh, (w - nw) // 2:(w - nw) // 2 + nw, :] = image
    else:
        image_back = image
    return image_back

def img2input(img):
    img = np.transpose(img, (2, 0, 1))
    img = img / 255
    # 使用tile方法复制数组以改变形状
    tiled_array = np.tile(img, (16, 1, 1, 1))  # 复制16次,沿着每个维度(不包括batch size)复制
    input_array = tiled_array.astype(np.float32)
    return input_array


def std_output(pred):
    """
    将(16,7,8400)处理成(8400, 8)  85= box:4  conf:1 cls:3
    """
    pred = np.squeeze(pred)
    print("-----", pred.shape)
    pred = pred[15]
    pred = np.transpose(pred, (1, 0))
    pred_class = pred[..., 4:]
    pred_conf = np.max(pred_class, axis=-1)
    pred = np.insert(pred, 4, pred_conf, axis=-1)
    return pred

def xywh2xyxy(*box):
    """
    将xywh转换为左上角点和左下角点
    Args:
        box:
    Returns: x1y1x2y2
    """
    ret = [box[0] - box[2] // 2, box[1] - box[3] // 2, \
           box[0] + box[2] // 2, box[1] + box[3] // 2]
    return ret


def get_inter(box1, box2):
    """
    计算相交部分面积
    Args:
        box1: 第一个框
        box2: 第二个狂
    Returns: 相交部分的面积
    """
    x1, y1, x2, y2 = xywh2xyxy(*box1)
    x3, y3, x4, y4 = xywh2xyxy(*box2)
    # 验证是否存在交集
    if x1 >= x4 or x2 <= x3:
        return 0
    if y1 >= y4 or y2 <= y3:
        return 0
    # 将x1,x2,x3,x4排序,因为已经验证了两个框相交,所以x3-x2就是交集的宽
    x_list = sorted([x1, x2, x3, x4])
    x_inter = x_list[2] - x_list[1]
    # 将y1,y2,y3,y4排序,因为已经验证了两个框相交,所以y3-y2就是交集的宽
    y_list = sorted([y1, y2, y3, y4])
    y_inter = y_list[2] - y_list[1]
    # 计算交集的面积
    inter = x_inter * y_inter
    return inter


def get_iou(box1, box2):
    """
    计算交并比: (A n B)/(A + B - A n B)
    Args:
        box1: 第一个框
        box2: 第二个框
    Returns:  # 返回交并比的值
    """
    box1_area = box1[2] * box1[3]  # 计算第一个框的面积
    box2_area = box2[2] * box2[3]  # 计算第二个框的面积
    inter_area = get_inter(box1, box2)
    union = box1_area + box2_area - inter_area  # (A n B)/(A + B - A n B)
    iou = inter_area / union
    return iou


def nms(pred, conf_thres, iou_thres):
    """
    非极大值抑制nms
    Args:
        pred: 模型输出特征图
        conf_thres: 置信度阈值
        iou_thres: iou阈值
    Returns: 输出后的结果
    """
    box = pred[pred[..., 4] > conf_thres]  # 置信度筛选
    cls_conf = box[..., 5:]
    cls = []
    for i in range(len(cls_conf)):
        cls.append(int(np.argmax(cls_conf[i])))
    total_cls = list(set(cls))  # 记录图像内共出现几种物体
    output_box = []
    # 每个预测类别分开考虑
    for i in range(len(total_cls)):
        clss = total_cls[i]
        cls_box = []
        temp = box[:, :6]
        for j in range(len(cls)):
            # 记录[x,y,w,h,conf(最大类别概率),class]值
            if cls[j] == clss:
                temp[j][5] = clss
                cls_box.append(temp[j][:6])
        #  cls_box 里面是[x,y,w,h,conf(最大类别概率),class]
        cls_box = np.array(cls_box)
        sort_cls_box = sorted(cls_box, key=lambda x: -x[4])  # 将cls_box按置信度从大到小排序
        # box_conf_sort = np.argsort(-box_conf)
        # 得到置信度最大的预测框
        max_conf_box = sort_cls_box[0]
        output_box.append(max_conf_box)
        sort_cls_box = np.delete(sort_cls_box, 0, 0)
        # 对除max_conf_box外其他的框进行非极大值抑制
        while len(sort_cls_box) > 0:
            # 得到当前最大的框
            max_conf_box = output_box[-1]
            del_index = []
            for j in range(len(sort_cls_box)):
                current_box = sort_cls_box[j]
                iou = get_iou(max_conf_box, current_box)
                if iou > iou_thres:
                    # 筛选出与当前最大框Iou大于阈值的框的索引
                    del_index.append(j)
            # 删除这些索引
            sort_cls_box = np.delete(sort_cls_box, del_index, 0)
            if len(sort_cls_box) > 0:
                # 我认为这里需要将clas_box先按置信度排序, 才能每次取第一个
                output_box.append(sort_cls_box[0])
                sort_cls_box = np.delete(sort_cls_box, 0, 0)
    return output_box


def cod_trf(result, pre, after):
    """
    因为预测框是在经过letterbox后的图像上做预测所以需要将预测框的坐标映射回原图像上
    Args:
        result:  [x,y,w,h,conf(最大类别概率),class]
        pre:    原尺寸图像
        after:  经过letterbox处理后的图像
    Returns: 坐标变换后的结果,
    """
    res = np.array(result)
    x, y, w, h, conf, cls = res.transpose((1, 0))
    x1, y1, x2, y2 = xywh2xyxy(x, y, w, h)  # 左上角点和右下角的点
    h_pre, w_pre, _ = pre.shape
    h_after, w_after, _ = after.shape
    scale = max(w_pre / w_after, h_pre / h_after)  # 缩放比例
    h_pre, w_pre = h_pre / scale, w_pre / scale  # 计算原图在等比例缩放后的尺寸
    x_move, y_move = abs(w_pre - w_after) // 2, abs(h_pre - h_after) // 2  # 计算平移的量
    ret_x1, ret_x2 = (x1 - x_move) * scale, (x2 - x_move) * scale
    ret_y1, ret_y2 = (y1 - y_move) * scale, (y2 - y_move) * scale
    ret = np.array([ret_x1, ret_y1, ret_x2, ret_y2, conf, cls]).transpose((1, 0))
    return ret


def draw(res, image, cls):
    """
    将预测框绘制在image上
    Args:
        res: 预测框数据
        image: 原图
        cls: 类别列表,类似["X1", "X2", "X3"]  可以通过数据集的yaml文件获取
    Returns:
    """
    for r in res:
        # 画框
        image = cv2.rectangle(image, (int(r[0]), int(r[1])), (int(r[2]), int(r[3])), (255, 0, 0), 3)
        # 表明类别
        text = "{}:{}".format(cls[int(r[5])], \
                              round(float(r[4]), 2))
        h, w = int(r[3]) - int(r[1]), int(r[2]) - int(r[0])  # 计算预测框的长宽
        font_size = min(h / 640, w / 640) * 15  # 计算字体大小(随框大小调整)
        image = cv2.putText(image, text, (max(10, int(r[0])), max(20, int(r[1]))), cv2.FONT_HERSHEY_COMPLEX,
                            max(font_size, 0.3), (255, 0, 0), 2)  # max()为了确保字体不过界
    return image
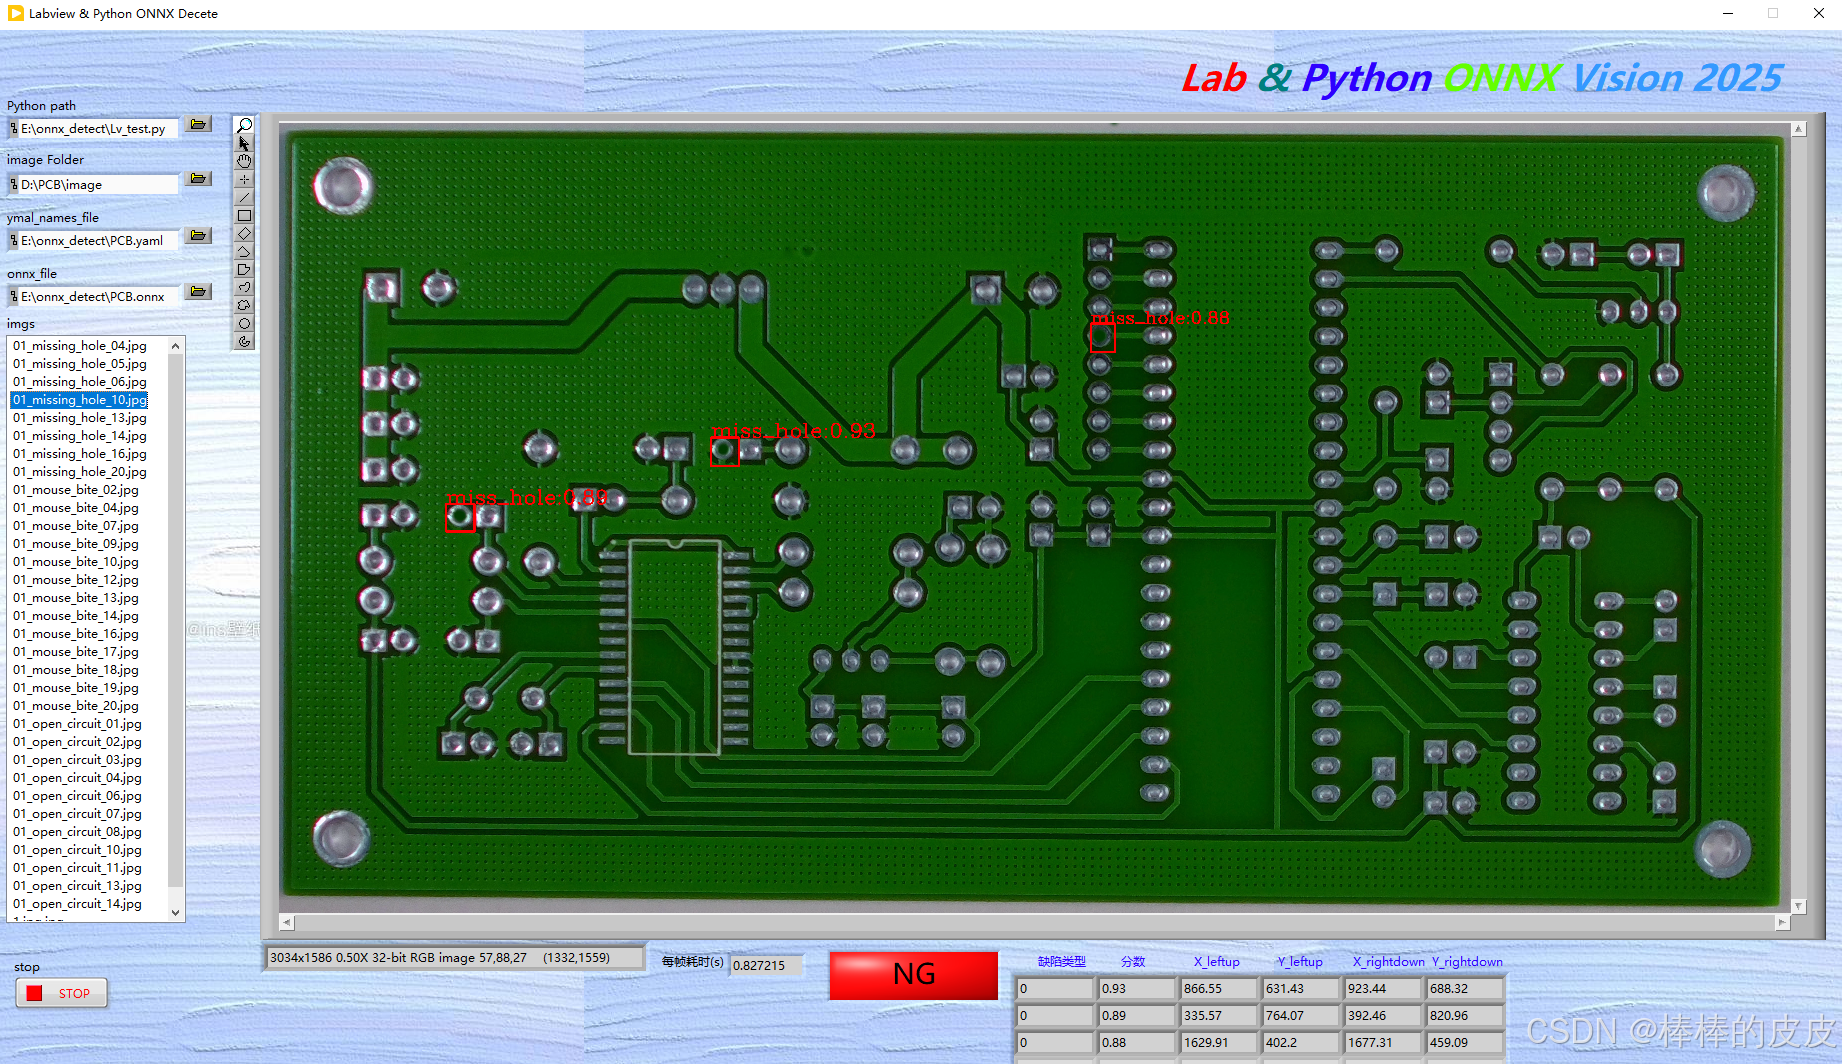
效果图:
后记:
仅为记录labview与Python结合的深度学习过程,如有不对感谢指出。
若有需要帮助或源码可私信交流。
更多推荐
 8
8 0
0- 0


 已为社区贡献2条内容

所有评论(0)