
python --insightface人脸识别/相似变换/仿射变换/透视变换
【代码】python --insightface人脸识别。
·
环境问题
python: 3.10.3
insightface==0.7.3
numpy==1.24.4
opencv-python==4.11.0.86
模型下载地址
通过网盘分享的文件:models.zip
链接: https://pan.baidu.com/s/1RNIw6KI5iL2FngJGUldjLQ 提取码: 1111
linux : pip install insightface 直接安装目前无错误
windows遇到错误: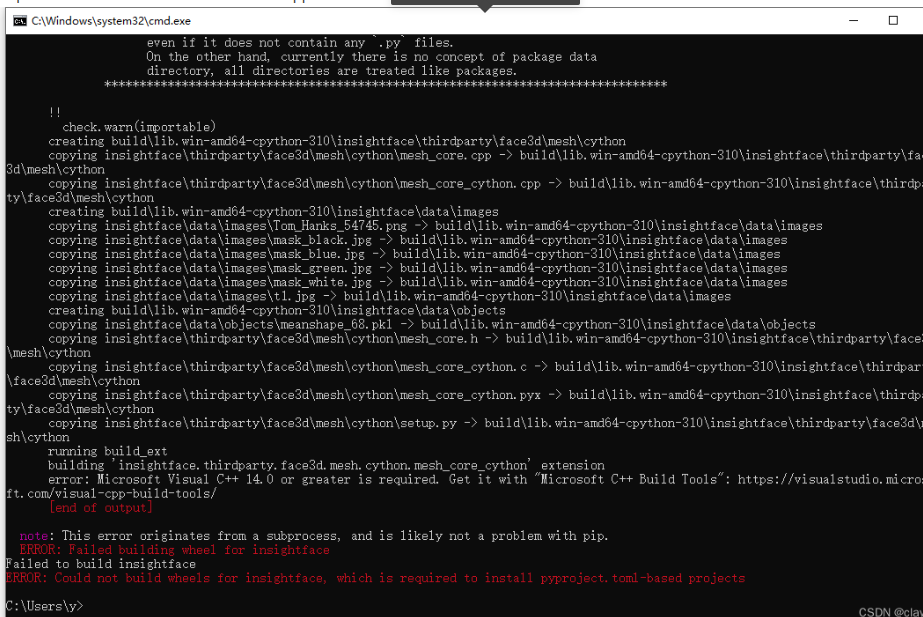
把这个安装上 就可以正常安装了
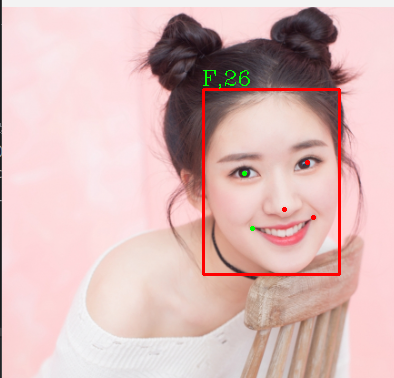
人脸检测
import cv2
import numpy as np
import insightface
from insightface.app import FaceAnalysis
from insightface.data import get_image as ins_get_image

app = FaceAnalysis(
    name='buffalo_l',
    root=r'./models/renlian',
    providers=['CPUExecutionProvider'])

app.prepare(ctx_id=0, det_size=(1024, 1024))
img = cv2.imread(r"C:\Users\123\Desktop\12.png")

faces = app.get(img)
rimg = app.draw_on(img, faces) # 可视化


if faces:  # 若检测到人脸
    first_face = faces[0]  # 获取第一张人脸
    print("人脸信息:")
    print(f"边界框:{first_face.bbox.astype(int)}")  # 转换为整数坐标
    print(f"关键点:{first_face.kps.astype(int)}")
    print(f"检测置信度:{first_face.det_score:.2f}")
    print(f"性别(0=女,1=男):{first_face.gender}")
    print(f"预测年龄:{first_face.age}岁")
    print(f"特征向量长度:{len(first_face.embedding)}")  # 如512
    print("人脸姿态(yaw, pitch, roll):", first_face.pose) # yaw(偏航角):左右旋转(-90°~90°,正值为右转,负值为左转);  pitch(俯仰角):上下旋转(-90°~90°,正值为抬头,负值为低头); roll(翻滚角):平面旋转(-90°~90°,正值为向右倾斜,负值为向左倾斜)。
    print("2D 106点关键点数量:", len(first_face.landmark_2d_106))  # 106
    print("3D 68点关键点数量:", len(first_face.landmark_3d_68))    # 68


cv2.imshow('', rimg)
cv2.waitKey(0)
cv2.destroyAllWindows()
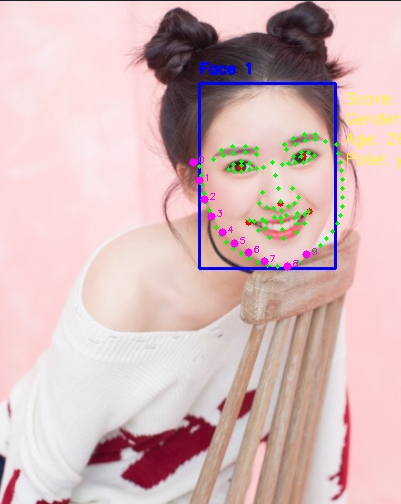
自定义画关键点信息
import cv2
import numpy as np
from insightface.app import FaceAnalysis

# 初始化人脸分析工具
app = FaceAnalysis(
    name='buffalo_l',
    root=r'./models/renlian',
    providers=['CPUExecutionProvider']
)
app.prepare(ctx_id=-1, det_size=(1024, 1024))  # 使用CPU

# 读取图片
img_path = r"C:\Users\123\Desktop\12.png"
img = cv2.imread(img_path)
if img is None:
    print(f"无法读取图片:{img_path}")
else:
    # 复制原图用于绘制(避免修改原图)
    rimg = img.copy()
    faces = app.get(img)

    if faces:
        for i, face in enumerate(faces):
            # --------------------------
            # 1. 绘制人脸边界框(蓝色)
            # --------------------------
            bbox = face.bbox.astype(int)
            x1, y1, x2, y2 = bbox
            cv2.rectangle(rimg, (x1, y1), (x2, y2), (255, 0, 0), 2)  # 蓝色矩形框

            # 在框上方标注人脸ID
            cv2.putText(
                rimg, f"Face {i+1}", (x1, y1-10),
                cv2.FONT_HERSHEY_SIMPLEX, 0.5, (255, 0, 0), 2
            )

            # --------------------------
            # 2. 绘制5点基础关键点(红色)
            # --------------------------
            for (x, y) in face.kps.astype(int):
                cv2.circle(rimg, (x, y), 3, (0, 0, 255), -1)  # 红色实心圆

            # --------------------------
            # 3. 绘制2D 106点关键点(绿色,更密集)
            # --------------------------
            for (x, y) in face.landmark_2d_106.astype(int):
                cv2.circle(rimg, (x, y), 2, (0, 255, 0), -1)  # 绿色小圆点

            # --------------------------
            # 4. 绘制3D 68点关键点(紫色,带深度示意)
            # --------------------------
            # 为了区分3D点,用稍大的紫色点并标注序号(选前10个示例,避免过于密集)
            for idx, (x, y, z) in enumerate(face.landmark_3d_68.astype(int)):
                if idx < 10:  # 只标前10个,否则画面太乱
                    cv2.circle(rimg, (x, y), 4, (255, 0, 255), -1)  # 紫色点
                    cv2.putText(
                        rimg, f"{idx}", (x+5, y),
                        cv2.FONT_HERSHEY_SIMPLEX, 0.3, (255, 0, 255), 1
                    )

            # --------------------------
            # 5. 标注其他信息(性别、年龄、姿态等)
            # --------------------------
            info = [
                f"Score: {face.det_score:.2f}",
                f"Gender: {'Female' if face.gender == 0 else 'Male'}",
                f"Age: {face.age}",
                f"Pose: yaw={face.pose[0]:.1f}, pitch={face.pose[1]:.1f}, roll={face.pose[2]:.1f}"
            ]
            # 在人脸框右侧依次绘制信息
            for j, text in enumerate(info):
                y_pos = y1 + 20 + j * 20
                cv2.putText(
                    rimg, text, (x2 + 10, y_pos),
                    cv2.FONT_HERSHEY_SIMPLEX, 0.5, (0, 255, 255), 1
                )

        # 保存标注后的图片
        output_path = "labeled_face.jpg"
        cv2.imwrite(output_path, rimg)
        print(f"标注完成,结果已保存至:{output_path}")
    else:
        print("未检测到人脸")
生产代码
import albumentations as A
import chromadb
from loguru import logger
import cv2
from insightface.app.common import Face
from insightface.app import FaceAnalysis
from chromadb import Settings
from shapely import LineString, Polygon
from shapely.geometry import box
import numpy as np
from threading import Thread as _async_t


class Renlian(object):
    '''人脸相关'''

    def __init__(self, weights_file):
        self.face_app = FaceAnalysis(
            name='buffalo_l',
            root=weights_file,
            providers=['CPUExecutionProvider']
        )
        self.det_size = (832, 832)  # 检测的大图或小图 尺寸越大 检测小脸精度越高
        self.face_app.prepare(ctx_id=-1, det_size=self.det_size)

        self.chroma_client = chromadb.HttpClient(  # 创建连接
            host='192.168.1.88',
            port=8000,
            settings=Settings(
                anonymized_telemetry=False  # 关闭自动上报
            )
        )

        self.face_collection = self.chroma_client.get_or_create_collection(
            name=FACE_TABEL_NAME,  # 库名
            metadata={"description": "人脸向量和id",  # 库的描述
                      "hnsw:space": "cosine"}  # 指定距离函数为余弦距离
        )  # 指向人脸库

        self.font = ImageFont.truetype('字体文件', 15)
        self.color = (255, 0, 0)
        self.face_count = 20  # 数据增强后的图像数量

    def extract_min_rectangle(self, regions: list, boxs: list) -> bool:
        """
        使用Shapely判断目标框是否与区域重叠

        参数:
            bbox: (x1, y1, x2, y2)
            region: [[[x1,y1], [x2,y2], ...]]] 三维数组
        """
        if not regions:  # 区域为空
            return True

        x1, y1, x2, y2 = boxs
        bbox_geom = box(x1, y1, x2, y2)  # 创建目标框的Shapely矩形对象

        # 提取区域的点列表
        region_points = [tuple(point) for point in regions[0]]
        num_points = len(region_points)

        # 根据点的数量创建不同的几何对象
        if num_points == 2:  # 直线
            region_geom = LineString(region_points)

        else:  # 多边形或矩形
            region_geom = Polygon(region_points)

        if bbox_geom.intersects(region_geom):  # 判断是否相交
            return True  # 在范围内
        return False  # 不在范围内

    def get_max_face(self, faces: list, regions, scores_threshold: float or int, max_face_area: int):
        '''提取最大的一个人脸和符合阈值的人脸'''
        max_face, max_area = None, -1  # 最大人脸  最大人脸面积
        for face in faces:  # 循环每个人脸特征
            conf = float(face.det_score)  # 置信度
            boxs = face.bbox.astype(int).tolist()  # 边界框

            if conf < scores_threshold:  # 置信度小于目标过滤
                continue

            if not self.extract_min_rectangle(regions, boxs):  # 不在区域内过滤
                continue

            x1, y1, x2, y2 = boxs  # 人脸框
            area = (x2 - x1) * (y2 - y1)  # 快速计算面积

            if area > max_area:  # 当前人脸大于最大人脸时 更新最大人脸
                max_face = face
                max_area = area

        if max_area < max_face_area:  # 过滤掉小脸
            max_face = None
            logger.error(f'最大人脸框面积过小,过滤;实际面积:【{max_area}】; 参数:【{max_face_area}】')
        return max_face

    def detect(self, image, regions, scores_threshold, max_face_area):
        '''
        人脸检测
        @params image            --> cv2图;
        @params scores_threshold --> 置信度;
        '''
        faces = self.face_app.get(image)
        if not faces:  # 未检测到人脸
            return False

        max_face = self.get_max_face(faces, regions, scores_threshold, max_face_area)  # 根据区域过滤,得到最大的人脸
        if not max_face:  # 在区域内未检测到人脸 或 人脸置信度过低
            return False

        return max_face

    def face_register(self, image, face_id, people_type):
        '''
        人脸注册
        @params image           --> cv2图;
        @params face_id         --> 人脸id(str类型);
        @params people_type     --> 人员类别;(0:访客; 1:员工);
        '''
        image = cv2.cvtColor(image, cv2.COLOR_BGR2RGB)
        face: Face = self.detect(image, [], 0.3, 3000)  # 注册时固定给3000面积
        if not face:
            logger.error(f'未检测到人脸')
            return False

        yaw, pitch, roll = face.pose  # 人脸姿态
        if not all((
                abs(yaw) <= 25,  # 俯仰角在±度内
                abs(pitch) <= 25,  # 偏航角在±度内
                abs(roll) <= 25  # 滚转角在±度内
        )):
            logger.error(f'人脸角度有误; 俯仰角:【{yaw}】, 偏航角:【{pitch}】, 滚转角:【{roll}】')
            return False # 未检测到标准人脸

        try:
            ids = f'original_{face_id}'
            self.face_collection.add(
                ids=[ids],  # 原图_传入的id作为唯一标识
                embeddings=[face.embedding],  # 新向量(存在则覆盖)
                metadatas=[{
                    "ids": ids,
                    "face_id": str(face_id),
                    "people_type": people_type,
                }]  # 新元数据(存在则覆盖)
            )
            logger.success(f'人脸注册成功;face_id:【{face_id}】')
            p = _async_t(target=self.async_aug_face_register, args=(image, face_id, people_type))  # 数据增强
            p.daemon = True
            p.start()
            return True  # 统一返回“成功”,不区分“新增”还是“覆盖”
        except Exception as e:
            logger.error(f'{e}')
            return False

    def async_aug_face_register(self, image, face_id, people_type):
        '''人脸注册数据增强(异步)'''

        face_aug = self.face_augmentor()  # 数据增强函数
        for i in range(1, self.face_count + 1):  # 生成固定张数的人脸
            logger.debug(f'人脸数据增强第{i}次')
            augmented = face_aug(image=image)
            img_aug_rgb = augmented["image"]
            face: Face = self.detect(img_aug_rgb, [], 0.3)

            if not face:
                logger.error(f'未检测到人脸')
                continue

            try:
                ids = f'aug_{i}_{face_id}'
                self.face_collection.add(
                    ids=[ids],  # aug_次数_传入的id作为唯一标识
                    embeddings=[face.embedding],  # 新向量(存在则覆盖)
                    metadatas=[{
                        "ids": ids,
                        "face_id": str(face_id),
                        "people_type": people_type,
                    }]  # 新元数据(存在则覆盖)
                )
                logger.success(f'人脸注册成功;face_id:【aug_{i}_{face_id}】')
            except Exception as e:
                logger.error(f'{e}')
                continue

    def face_compare(self, image, regions, scores_threshold, face_pose_angle, max_face_area):
        '''
        人脸比对
        @params image --> cv2图;
        '''
        image = cv2.cvtColor(image, cv2.COLOR_BGR2RGB)
        face: Face = self.detect(image, regions, scores_threshold, max_face_area)
        if not face:
            return False, image, []  # 未检测到人脸

        yaw, pitch, roll = face.pose  # 人脸姿态
        if not all((
                abs(yaw) <= face_pose_angle,  # 俯仰角在±度内
                abs(pitch) <= face_pose_angle,  # 偏航角在±度内
                abs(roll) <= face_pose_angle  # 滚转角在±度内
        )):
            logger.error(f'人脸角度有误; 俯仰角:【{yaw}】, 偏航角:【{pitch}】, 滚转角:【{roll}】; 传参:【{face_pose_angle}】')
            return False, image, []  # 未检测到标准人脸

        face_embedding = face.embedding  # 提取的人脸向量
        query_result: dict = self.face_collection.query(  # 根据向量查余弦值  余弦值越小相似度越高 范围0-2  0最相似
            query_embeddings=face_embedding,
            n_results=3,  # 取3个结果
        )
        distances_list = query_result['distances'][0]  # 余弦结果  支持多个向量匹配 目前场景取最大的 固定取第一个结果
        face_id_list = query_result['ids'][0]  # 人脸id数组
        metadatas_list = query_result['metadatas'][0]  # 元数据

        results = []  # 结果容器
        for index, cosine_distance in enumerate(distances_list):
            similar = 1 - cosine_distance  # 转为直观的余弦相似度
            if similar <= 0.65:  # 小于0则认为差距过大 一定不是 直接过滤
                continue

            results.append({
                'face_id': face_id_list[index],
                'cos_similar': similar,
                'people_type': metadatas_list[index]['people_type']
            })
        self.draw_image(image, regions, face)
        logger.success(f'返回:【{results}】')
        image = cv2.cvtColor(image, cv2.COLOR_RGB2BGR)
        return True, image, results

    def draw_image(self, image, regions, face: Face):
        '''对图片画图'''
        for region in regions:  # 画多边形
            points = np.array(region, np.int32).reshape((-1, 1, 2))
            cv2.polylines(
                image,
                [points],
                isClosed=True,
                color=(255, 255, 255),
                thickness=2
            )

        x1, y1, x2, y2 = face.bbox.astype(int)
        cv2.rectangle(image, (x1, y1), (x2, y2), (0, 0, 255), 2)  # 蓝色矩形框
        return image

    def get_face_all(self, face_id) -> list:
        '''查询人脸全部元数据'''
        if face_id:
            result = self.face_collection.get(where={'face_id': str(face_id)})
        else:
            result = self.face_collection.get(ids=[])
        metadatas = result['metadatas']
        return metadatas

    def batch_delete(self, face_id_list: list):
        '''根据id批量删除人脸信息'''
        for face_id in face_id_list:
            self.face_collection.delete(where={'face_id': str(face_id)})
            logger.error(f'删除人脸:【{face_id}】')


    def face_augmentor(self):
        '''人脸数据增强'''
        return A.Compose([
            A.RandomScale(scale_limit=(0.1, 0.2), interpolation=cv2.INTER_LINEAR, p=0.3),  # 缩小 放大
            A.Rotate(limit=(-20, 20), interpolation=cv2.INTER_LINEAR, border_mode=cv2.BORDER_REPLICATE, p=0.3),# 旋转
            A.RandomBrightnessContrast(brightness_limit=0.2,  contrast_limit=0.2, p=0.5),  # 亮度 对比度
            A.ToGray(p=0.1),  # p=0.3 表示 30% 概率转为灰度图,70% 保留彩色
            A.GaussNoise(std_range=(0.03, 0.1), mean_range=(0.0, 0.0), p=0.2), # 高斯噪声
            A.GaussianBlur(blur_limit=(2, 3), sigma_limit=1, p=0.3), # 高斯模糊
            A.HueSaturationValue(hue_shift_limit=10, sat_shift_limit=20, p=0.3),  # 色调/饱和度调整
            A.Resize(height=self.det_size[0], width=self.det_size[1]),
        ])


r = Renlian('./models/renlian')
# print(r.get_face_all('人脸id')) 查询
# r.chroma_client.delete_collection('face') 删库

img = cv2.imread('./1.png') # 注册人脸
a = r.face_register(img, face_id, '人员类型')
#print(f'返回:【{a}】')


# a,b,c = r.face_compare(image, [], 0.1, 20, 10000)  # 人脸比对  cv2图 区域  人脸置信度  人脸姿态偏转角度  人脸最小面积
# print(a)
loguru==0.7.3
numpy==1.24.4
opencv-python==4.11.0.86
insightface==0.7.3
chromadb==0.5.12
albumentations==2.0.8
可落地的人脸识别方案
- 取连续帧中最优图像质量
- 人脸矫正(相似变换)
- 送检人脸比对
import cv2
import numpy as np
import insightface
from insightface.app import FaceAnalysis

# ======================
# 1. 初始化 InsightFace 人脸分析模块
# ======================
# 创建人脸分析实例,指定使用 CPU 推理
app = FaceAnalysis(providers=['CUDAExecutionProvider'],
                   name='buffalo_l',
                   root=r'.\models\renlian'
                   )
app.prepare(ctx_id=0, det_size=(640, 640))

# ======================
# 2. 5点人脸标准矫正(相似变换)
# ======================
def align_face(img, landmark):
    """
    基于 5 个人脸关键点做标准相似变换对齐(行业通用 112x112 格式)
    变换类型:相似变换(4自由度:平移、旋转、均匀缩放,无切变/歪斜)
    参数:
        img: 输入原始图像(BGR 格式)
        landmark: insightface 输出的 5 个关键点,顺序:右眼、左眼、鼻尖、右嘴角、左嘴角
    返回:
        aligned: 矫正后的 112x112 标准人脸图像
        M: 2x3 相似变换矩阵
    """
    # 112x112 标准人脸的 5 个基准关键点坐标(人脸识别通用标准模板)
    template = np.array([
        [38.2946, 51.6963],  # 右眼
        [73.5318, 51.5014],  # 左眼
        [56.0252, 71.7366],  # 鼻尖
        [41.5493, 92.3655],  # 右嘴角
        [70.7299, 92.2041]  # 左嘴角
    ], dtype=np.float32)

    # 转换关键点数据类型
    kps = landmark.astype(np.float32)

    # 计算从原图关键点到标准模板的 相似变换矩阵
    # cv2.estimateAffinePartial2D 求解的是 4自由度相似变换,不是完整6自由度仿射
    M = cv2.estimateAffinePartial2D(kps, template)[0]

    # 应用相似变换,输出 112x112 标准对齐人脸
    aligned = cv2.warpAffine(img, M, (112, 112))

    return aligned, M


# ======================
# 3. 人脸质量综合评分
# ======================
def face_quality(face_img, face):
    """
    对单个人脸进行多维度质量评分,用于筛选最优帧人脸
    评分维度:清晰度 + 人脸面积 + 姿态角度
    参数:
        face_img: 从原图裁剪出的人脸区域图像
        face: insightface 返回的人脸对象
    返回:
        score: 综合质量分
        clarity: 清晰度得分
    """
    # 转为灰度图
    gray = cv2.cvtColor(face_img, cv2.COLOR_BGR2GRAY)

    # 拉普拉斯方差法计算清晰度:数值越高越清晰
    clarity = cv2.Laplacian(gray, cv2.CV_64F).var()

    # 计算人脸框面积
    x1, y1, x2, y2 = face.bbox
    area = (x2 - x1) * (y2 - y1)

    # 获取人脸三维姿态:俯仰角 pitch、偏航角 yaw、翻滚角 roll
    pitch, yaw, roll = face.pose

    # 姿态得分:角度越小得分越高
    pose_score = 1.0 / (1 + abs(yaw) + abs(pitch))

    # 加权综合评分
    score = clarity * 0.6 + area * 0.3 + pose_score * 0.1

    return score, clarity


# ======================
# 4. 连续帧最优人脸选择器类
# 功能:逐帧检测 → 矫正 → 质量过滤 → 保留质量最高的人脸特征
# ======================
class BestFaceSelector:
    def __init__(self):
        # 最优结果初始化
        self.best_score = -1  # 最优质量分数
        self.best_embedding = None  # 最优人脸特征向量
        self.best_aligned_face = None  # 最优矫正后的标准人脸图

    def process_frame(self, frame):
        """
        处理单帧图像,更新最优人脸
        参数:frame 输入单帧图像(BGR)
        返回:True 表示处理到有效人脸,False 表示无有效人脸
        """
        # 检测当前帧所有人脸
        faces = app.get(frame)
        if not faces:
            return False

        # 选择面积最大的人脸(通常为画面主体)
        face = max(faces, key=lambda f: (f.bbox[2] - f.bbox[0]) * (f.bbox[3] - f.bbox[1]))
        x1, y1, x2, y2 = map(int, face.bbox)

        # 裁剪人脸区域
        face_img = frame[y1:y2, x1:x2]
        if face_img.size == 0:
            return False

        # 质量打分 + 清晰度过滤(低于阈值视为模糊,直接丢弃)
        score, clarity = face_quality(face_img, face)
        if clarity < 40:
            return False

        # 对整图进行标准相似变换矫正,得到 112x112 标准人脸
        aligned_face, _ = align_face(frame, face.kps)

        # 使用矫正后的标准人脸重新提取特征(识别精度更高)
        feats = app.get(aligned_face)
        if len(feats) > 0:
            feat = feats[0]
        else:
            feat = face.embedding  # 降级使用原始检测特征

        # 如果当前人脸质量更高,则更新最优结果
        if score > self.best_score:
            self.best_score = score
            self.best_embedding = feat
            self.best_aligned_face = aligned_face

        return True

    def get_best(self):
        """
        获取最终筛选出的最优结果
        返回:最优特征向量、最优标准人脸、最优质量分数
        """
        return self.best_embedding, self.best_aligned_face, self.best_score

if __name__ == "__main__":
    selector = BestFaceSelector()

    # 模拟连续帧路径
    frame_paths = [r"C:\Users\123\Desktop\11\11.png",
                   r"C:\Users\123\Desktop\11\22.png",
                   ]
    for p in frame_paths:
        frame = cv2.imread(p)
        if frame is None:
            continue
        selector.process_frame(frame)

    best_emb, best_aligned, best_score = selector.get_best()
    if best_emb is not None:
        print("最优人脸向量形状:", best_emb.shape)
        print("最优质量分数:", best_score)
        best_aligned = cv2.resize(best_aligned, (640,640))
        cv2.imshow("aligned_face", best_aligned)
        cv2.waitKey(0)
        cv2.destroyAllWindows()
【附录】
相似变换/仿射变换/透视变换
import cv2
import numpy as np

def similarity_transform_np(img, src_points):
    """
    相似变换 (n ≥ 2 个点)
    :param img: 输入图像
    :param src_points: n个点, 形状 (n,2) 或 list[[x,y],...]
    :return: 矫正后图像
    """
    h, w = img.shape[:2]
    src = np.array(src_points, dtype=np.float32)
    dst = np.float32([[0, 0], [w-1, 0], [w-1, h-1], [0, h-1]])[:len(src)]

    M, _ = cv2.estimateAffinePartial2D(src, dst, method=cv2.RANSAC)
    return cv2.warpAffine(img, M, (w, h))

def affine_transform_np(img, src_points):
    """
    仿射变换 (n ≥ 3 个点)
    """
    h, w = img.shape[:2]
    src = np.array(src_points, dtype=np.float32)
    dst = np.float32([[0, 0], [w-1, 0], [w-1, h-1], [0, h-1]])[:len(src)]

    M, _ = cv2.estimateAffine2D(src, dst, method=cv2.RANSAC)
    return cv2.warpAffine(img, M, (w, h))

def perspective_transform_np(img, src_points):
    """
    透视变换 (n ≥ 4 个点)
    """
    h, w = img.shape[:2]
    src = np.array(src_points, dtype=np.float32)
    dst = np.float32([[0, 0], [w-1, 0], [w-1, h-1], [0, h-1]])[:len(src)]

    M, _ = cv2.findHomography(src, dst, cv2.RANSAC)
    return cv2.warpPerspective(img, M, (w, h))
更多推荐


 1
1 0
0- 0


 已为社区贡献1条内容

所有评论(0)